
|
Available Languages
|

|

|
Introduction |
Published date: 31/5/2016
|
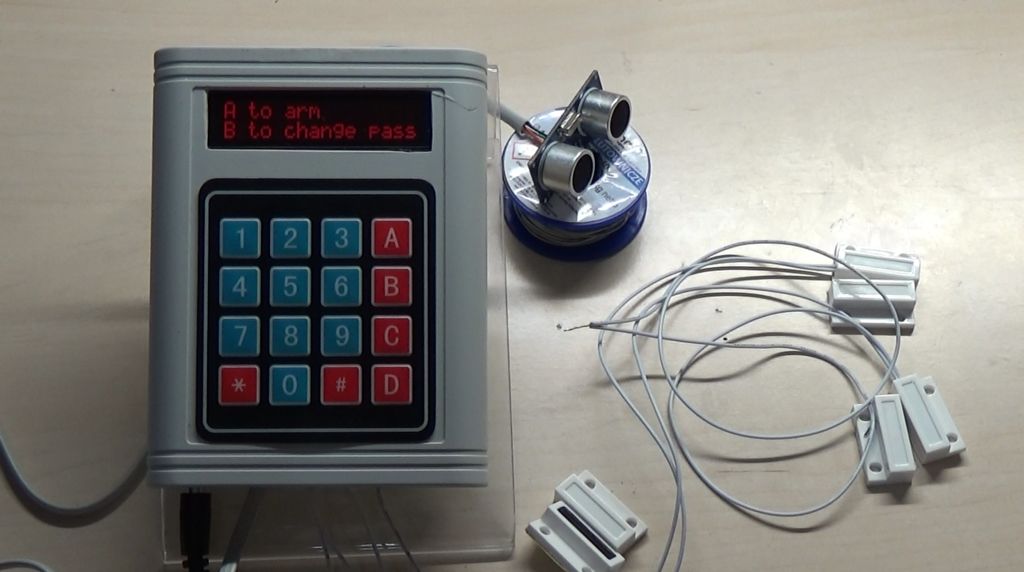
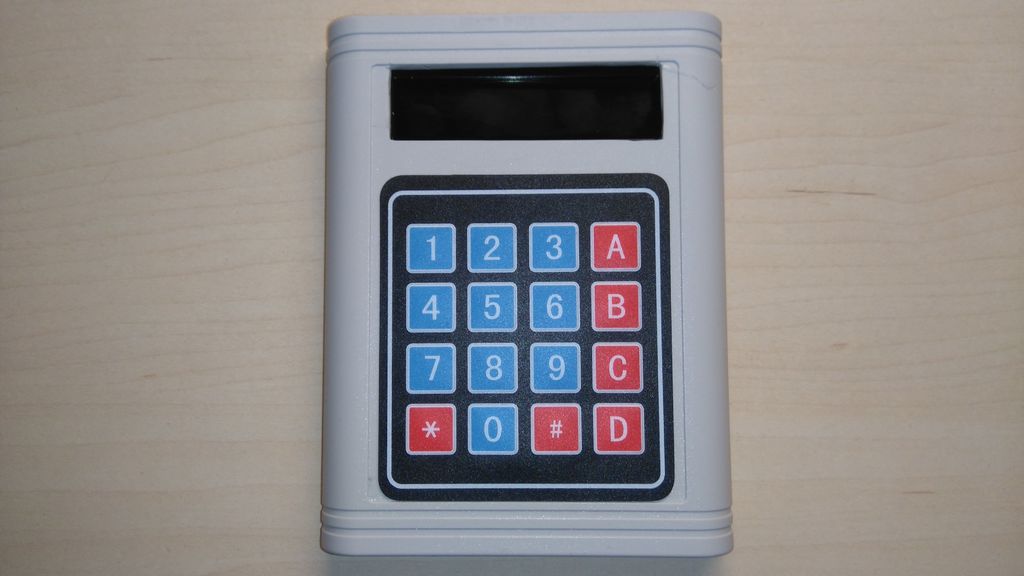
In this guide I will show you how to make your own password security system by using the Arduino uno board and some magnetic door switches. I made my own circuit by using the ATmega328 micro controller but this is an optional step. In this guide I will help you to make it easily on breadboard by using the Arduino uno board, and I will give you some extra tips on how you can make your own Arduino-based custom circuit.
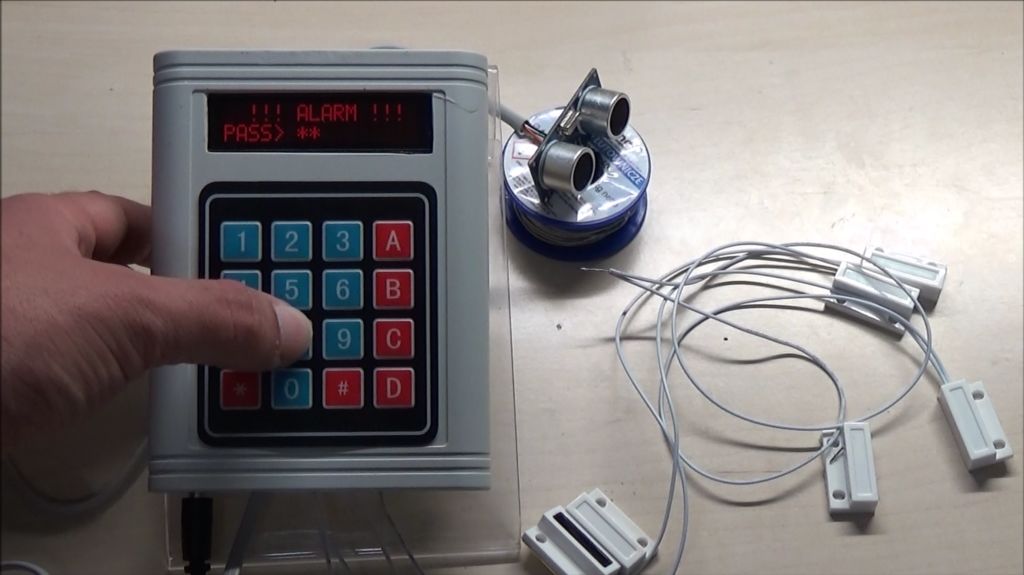
By using this system you will be able to arm and disarm the security system. You can disarm it by typing the correct password and pressing the '*' button. If you want to change the current password, you can do it by pressing the 'B' button, and if you want to skip or abort an operation you can do it by pressing the '#' button. It also has a buzzer for making various tones during operation.
You can arm the system by pressing the 'A' button. System will give you 10 seconds to leave from your place, after 10 seconds the system will be armed. You can put as many windows magnetic switched you want. In this tutorial I will use two for windows and one for door. When a window opens, and the system is armed, you will hear the alarm tone from buzzer. You can still disarmed it by typing the correct password. When a door opens the system will give you 20 seconds to give the correct password. After 20 second you will hear the alarm tone. The system also uses an ultrasonic sensor that can detect motion.
Watch the operation video:
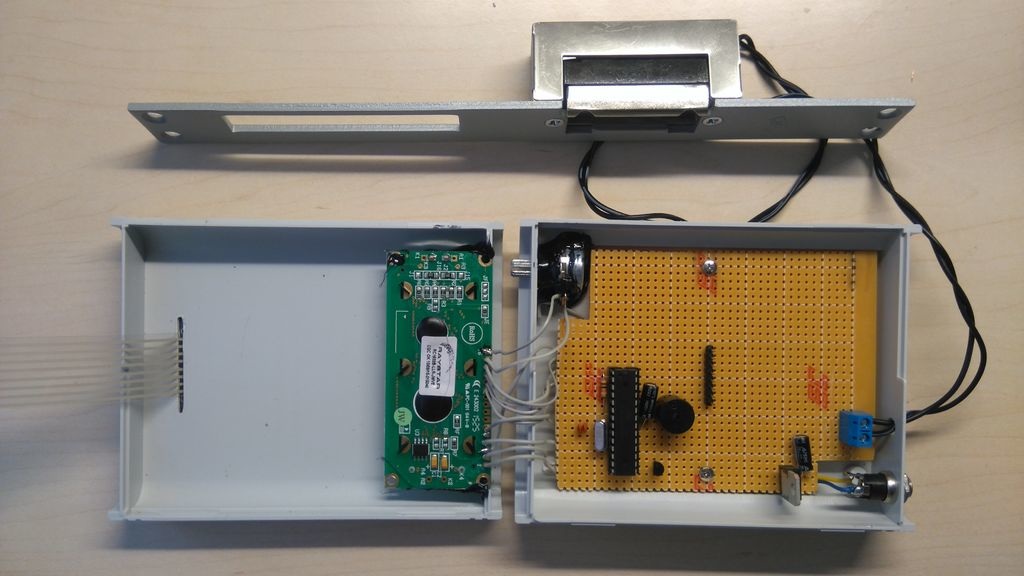
The electrical door opener that I used need 9 to 12V to operate. So for this system I used an 12V power adapter. As current passes through it, the electric lock remains open. Otherwise it remains closed.
This device was made only for educational and presentational purpose reasons, it can't be used in real life. If you want to use it on your home's door make sure that it's enough safe , for example use a metal box and put the power cables "inside the wall".
Let's get started!
This device was made only for educational and presentational purpose reasons, it can't be used in real life. If you want to use it on your home's door make sure that it's enough safe , for example use a metal box and put the power cables "inside the wall".
Let's get started!
What you will need - Hardware
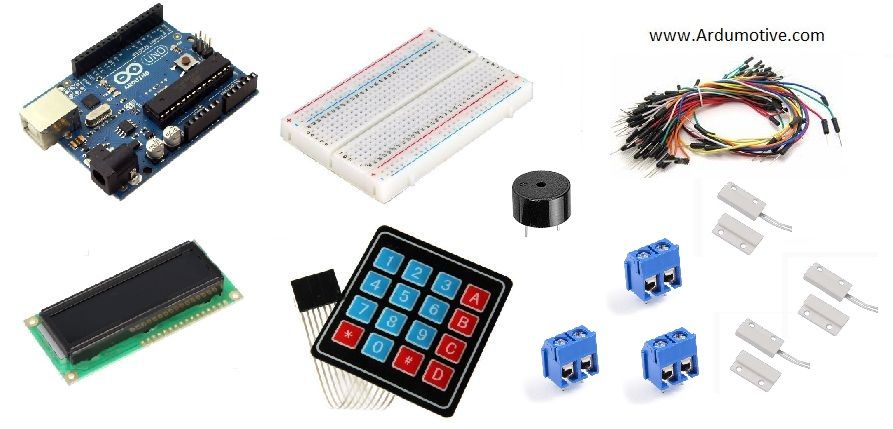
(ONLY) If you want to make your own custom - Arduino based - circuit you willalso need:
- DIP socket for atmega328
- 16Mhz crystal osc
- 2x 22pF ceramic, 2x 0.22uF electrolytic capacitors
- 1x 10K resistor
- DC power jack
- pcb prototyping board
- 5V power source
|
Tools:
|
|
The Circuit
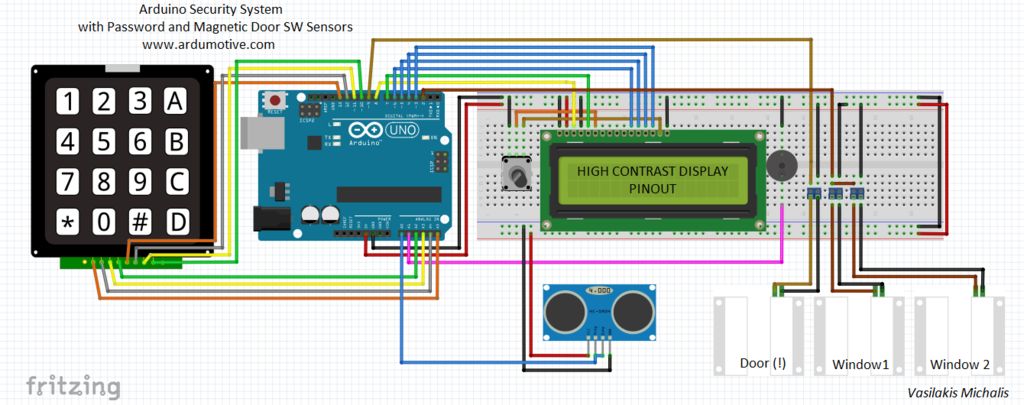
The connections are pretty easy, see the above image with the breadboard circuit schematic.
|
High contrast LCD:
Keypad 4x4: From left to the right pin:
|
|
The Code
Tip: If you want to change the time that door remain unlocked change the delay(time) at line 105. Default password is "8520".
1 2 3 4 5 6 7 8 9 10 11 12 13 14 15 16 17 18 19 20 21 22 23 24 25 26 27 28 29 30 31 32 33 34 35 36 37 38 39 40 41 42 43 44 45 46 47 48 49 50 51 52 53 54 55 56 57 58 59 60 61 62 63 64 65 66 67 68 69 70 71 72 73 74 75 76 77 78 79 80 81 82 83 84 85 86 87 88 89 90 91 92 93 94 95 96 97 98 99 100 101 102 103 104 105 106 107 108 109 110 111 112 113 114 115 116 117 118 119 120 121 122 123 124 125 126 127 128 129 130 131 132 133 134 135 136 137 138 139 140 141 142 143 144 145 146 147 148 149 150 151 152 153 154 155 156 157 158 159 160 161 162 163 164 165 166 167 168 169 170 171 172 173 174 175 176 177 178 179 180 181 182 183 184 185 186 187 188 189 190 191 192 193 194 195 196 197 198 199 200 201 202 203 204 205 206 207 208 209 210 211 212 213 214 215 216 217 218 219 220 221 222 223 224 225 226 227 228 229 230 231 232 233 234 235 236 237 238 239 240 241 242 243 244 245 246 247 248 249 250 251 252 253 254 255 256 257 258 259 260 261 262 263 264 265 266 267 268 269 270 271 272 273 274 275 276 277 278 279 280 281 282 283 284 285 286 287 288 289 290 291 292 293 294 295 296 297 298 299 300 301 302 303 304 305 306 307 308 309 310 311 312 313 314 315 316 317 318 319 320 321 322 323 324 325 326 327 328 329 330 331 332 333 334 335 336 337 338 339 340 341 342 343 344 345 346 347 348 349 350 351 352 353 354 355 356 357 358 359 360 361 362 363 364 365 366 367 368 369 370 371 372 373 374 375 376 377 378 379 380 381 382 383 384 385 386 387 388 389 390 391 392 393 | //Libraries #include <LiquidCrystal.h> #include <Keypad.h> #include <NewPing.h> #include "NewTone.h" /*-----------------------KEYPAD-----------------------*/ const byte numRows= 4; //number of rows on the keypad const byte numCols= 4; //number of columns on the keypad char keypressed; //keymap defines the key pressed according to the row and columns just as appears on the keypad char keymap[numRows][numCols]= { {'1', '2', '3', 'A'}, {'4', '5', '6', 'B'}, {'7', '8', '9', 'C'}, {'*', '0', '#', 'D'} }; //Code that shows the the keypad connections to the arduino terminals byte rowPins[numRows] = {A5,A4,A3,A2};//Rows 0 to 3 byte colPins[numCols] = {13,12,11,10};//Columns 0 to 3 //initializes an instance of the Keypad class Keypad myKeypad= Keypad(makeKeymap(keymap), rowPins, colPins, numRows, numCols); /*--------------------------CONSTANTS-------------------------*/ const int buzzer = A1; //Buzzer/small speaker const int doorMagSen = 9; //Door magnetic sensor const int windowMagSen = 2; //Window magnetic sensors LiquidCrystal lcd(8,7,6,5,4,3); //lcd ((RS, E, D4, D5, D6, D7) NewPing sonar(A0,A0,2000); // Trig Echo Max distance /*--------------------------VARIABLES------------------------*/ String password="2580"; //Variable to store the current password String tempPassword=""; //Variable to store the input password int doublecheck; boolean armed = false; //Variable for system state (armed:true / unarmed:false) boolean input_pass; //Variable for input password (correct:true / wrong:false) boolean storedPassword = true; boolean changedPassword = false; boolean checkPassword = false; int distance; int i = 1; //variable to index an array /**********************************************************************************/ void setup() { lcd.begin(16, 2); //Setup the LCD's number of columns and rows pinMode(doorMagSen,INPUT_PULLUP); //Set all magnetic sensors as input withn internal pullup resistor pinMode(windowMagSen,INPUT_PULLUP); } void loop() { //Main loop if (armed){ systemIsArmed(); //Run function to activate the system } else if (!armed){ systemIsUnarmed(); //Run fuction to de activate the system } } /********************************FUNCTIONS************************************/ //While system is unarmed void systemIsUnarmed(){ int screenMsg=0; lcd.clear(); //Clear lcd unsigned long previousMillis = 0; //To make a delay by using millis() function const long interval = 5000; //delay will be 5 sec. //every "page"-msg of lcd will change every 5 sec while(!armed){ //While system is unarmed do... unsigned long currentMillis = millis(); //Store the current run-time of the system (millis function) if (currentMillis - previousMillis >= interval) { previousMillis = currentMillis; if(screenMsg==0){ //First page-message of lcd lcd.setCursor(0,0); lcd.print("SYSTEM ALARM OFF"); lcd.setCursor(0,1); lcd.print("----------------"); screenMsg=1; } else{ //Second page-message of lcd lcd.setCursor(0,0); lcd.print("A to arm "); lcd.setCursor(0,1); lcd.print("B to change pass"); screenMsg=0; } } keypressed = myKeypad.getKey(); //Read the pressed button if (keypressed =='A'){ //If A is pressed, activate the system NewTone(buzzer,500,200); systemIsArmed(); //by calling the systemIsArmed function } else if (keypressed =='B'){//If B is pressed, change current password doublecheck=0; NewTone(buzzer,500,200); storedPassword=false; if(!changedPassword){ //By calling the changePassword function changePassword(); } } } } //While system is armed void systemIsArmed(){ lcd.clear(); int count=10; //Count 10sec before activate the system unsigned long previousMillis = 0; const long interval = 1000; while(!armed){ distance = sonar.ping_cm(); //Store distance from sensor only for first time //While system is unarmed - for 10sed do... lcd.setCursor(0,0); lcd.print(" SYSTEM WILL BE "); //Print message to lcd with 10 sec timer lcd.setCursor(0,1); lcd.print(" ARMED IN "); unsigned long currentMillis = millis(); if (currentMillis - previousMillis >= interval) { previousMillis = currentMillis; //Screen counter 10sec if (count>1){ count--; //Countdown timer } else{ armed=true; //Activate the system! break; } } lcd.setCursor(12,1); lcd.print(count); //show the timer at lcd second line 13 possition } while (armed){ //While system is armed do... lcd.setCursor(0,0); lcd.print("SYSTEM IS ARMED!"); lcd.setCursor(0,1); lcd.print("----------------"); int door = digitalRead(doorMagSen); //Read magnetic sensros and ultrasonic sensor int window = digitalRead(windowMagSen); int curr_distanse = sonar.ping_cm(); //Check values if (window==HIGH){ alarmFunction(); //Call alarm! } if (door==HIGH){ unlockPassword(); //Disarm the system with correct password } //Ultrasonic sensor code if (curr_distanse < (distance -5)){ //Check distanse (minus 5 for safety) with current distanse alarmFunction(); } } } //Door is opend, unlcok the system! void unlockPassword() { int count=21; //20 sec for alarm! retry: //label for goto, retry in case of wrong password tempPassword=""; //reset temp password (typing...) lcd.clear(); //clear lcd i=6; //variable to put * while typing pass unsigned long previousMillis = 0; const long interval = 1000; boolean buzzerState = false; //variable to help us make a beep NewTone while(!checkPassword){ //While waiting for correct password do... unsigned long currentMillis = millis(); if (currentMillis - previousMillis >= interval) { previousMillis = currentMillis; //play beep NewTone every 1 sec if (!buzzerState){ NewTone(buzzer, 700); buzzerState=true; } else{ noNewTone(buzzer); buzzerState=false; } if (count>0){ //Screen counter 20sec count--; } else{ alarmFunction(); //Times is up, ALARM! break; } } keypressed = myKeypad.getKey(); lcd.setCursor(0,0); lcd.print("ALARM IN: "); //For screen counter - 20sec if (count>=10){ lcd.setCursor(14,0); lcd.print(count); //print countdown timer at lcd } else{ //catch '0'bellow 10 (eg 09) lcd.setCursor(14,0); lcd.print(" "); lcd.print(count); } lcd.setCursor(0,1); lcd.print("PASS>"); if (keypressed != NO_KEY){ //Accept only numbers and * from keypad if (keypressed == '0' || keypressed == '1' || keypressed == '2' || keypressed == '3' || keypressed == '4' || keypressed == '5' || keypressed == '6' || keypressed == '7' || keypressed == '8' || keypressed == '9' ){ tempPassword += keypressed; lcd.setCursor(i,1); lcd.print("*"); //Put * on lcd i++; NewTone(buzzer,500,200); //Button NewTone } else if (keypressed == '*'){ //Check for password if (password==tempPassword){//If it's correct unarmed the system armed=false; NewTone(buzzer,700,500); break; } else{ //if it's false, retry tempPassword=""; NewTone(buzzer,200,200); delay(300); NewTone(buzzer,200,200); delay(300); goto retry; } } } } } //Alarm void alarmFunction(){ retry: //label for goto tempPassword=""; lcd.clear(); i=6; unsigned long previousMillis = 0; const long interval = 500; boolean buzzerState = false; while(!checkPassword){ //Waiting for password to deactivate the alarm... unsigned long currentMillis = millis(); if (currentMillis - previousMillis >= interval) { previousMillis = currentMillis; //Play a beep NewTone every 0.5 second if (!buzzerState){ NewTone(buzzer, 700); buzzerState=true; } else{ noNewTone(buzzer); buzzerState=false; } } keypressed = myKeypad.getKey(); lcd.setCursor(0,0); lcd.print(" !!! ALARM !!! "); lcd.setCursor(0,1); lcd.print("PASS>"); if (keypressed != NO_KEY){ //Accept only numbers and * if (keypressed == '0' || keypressed == '1' || keypressed == '2' || keypressed == '3' || keypressed == '4' || keypressed == '5' || keypressed == '6' || keypressed == '7' || keypressed == '8' || keypressed == '9' ){ tempPassword += keypressed; lcd.setCursor(i,1); lcd.print("*"); i++; } else if (keypressed == '*'){ if (password==tempPassword){ armed=false; NewTone(buzzer,700,500); break; } else{ tempPassword=""; NewTone(buzzer,200,200); delay(300); NewTone(buzzer,200,200); delay(300); goto retry; } } } } } //Change current password void changePassword(){ retry: //label for goto tempPassword=""; lcd.clear(); i=1; while(!changedPassword){ //Waiting for current password keypressed = myKeypad.getKey(); //Read pressed keys lcd.setCursor(0,0); lcd.print("CURRENT PASSWORD"); lcd.setCursor(0,1); lcd.print(">"); if (keypressed != NO_KEY){ if (keypressed == '0' || keypressed == '1' || keypressed == '2' || keypressed == '3' || keypressed == '4' || keypressed == '5' || keypressed == '6' || keypressed == '7' || keypressed == '8' || keypressed == '9' ){ tempPassword += keypressed; lcd.setCursor(i,1); lcd.print("*"); i++; NewTone(buzzer,800,200); } else if (keypressed=='#'){ break; } else if (keypressed == '*'){ i=1; if (password==tempPassword){ storedPassword=false; NewTone(buzzer,500,200); newPassword(); //Password is corrent, so call the newPassword function break; } else{ //Try again tempPassword=""; NewTone(buzzer,500,200); delay(300); NewTone(buzzer,500,200); delay(300); goto retry; } } } } } String firstpass; //Setup new password void newPassword(){ tempPassword=""; changedPassword=false; lcd.clear(); i=1; while(!storedPassword){ keypressed = myKeypad.getKey(); //Read pressed keys if (doublecheck==0){ lcd.setCursor(0,0); lcd.print("SET NEW PASSWORD"); lcd.setCursor(0,1); lcd.print(">"); } else{ lcd.setCursor(0,0); lcd.print("One more time..."); lcd.setCursor(0,1); lcd.print(">"); } if (keypressed != NO_KEY){ if (keypressed == '0' || keypressed == '1' || keypressed == '2' || keypressed == '3' || keypressed == '4' || keypressed == '5' || keypressed == '6' || keypressed == '7' || keypressed == '8' || keypressed == '9' ){ tempPassword += keypressed; lcd.setCursor(i,1); lcd.print("*"); i++; NewTone(buzzer,800,200); } else if (keypressed=='#'){ break; } else if (keypressed == '*'){ if (doublecheck == 0){ firstpass=tempPassword; doublecheck=1; newPassword(); } if (doublecheck==1){ doublecheck=0; if (firstpass==tempPassword){ i=1; firstpass=""; password = tempPassword; // New password saved tempPassword="";//erase temp password lcd.setCursor(0,0); lcd.print("PASSWORD CHANGED"); lcd.setCursor(0,1); lcd.print("----------------"); storedPassword=true; NewTone(buzzer,500,400); delay(2000); lcd.clear(); break; } else{ firstpass=""; newPassword(); } } } } } } |
|
Download the code from here and open it with Arduino IDE.
Inside you will also find the ultrasonic library file. |
| ||
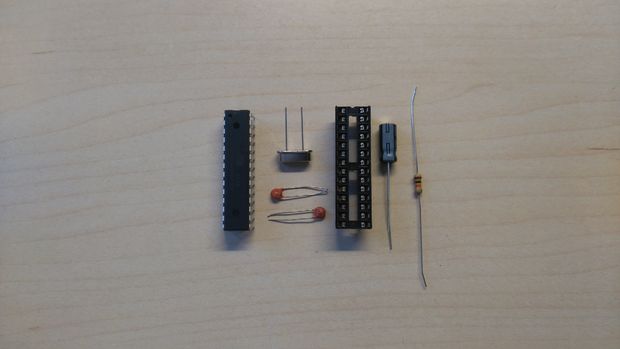
Make your own custom Arduino - based circuit
|
|
Now that you have successfully test your new project with the Arduino uno board, you can start making your own Arduino-based custom circuit! The procedure it's easy, but you will need some extras skills for making it.
So, I will try to give you some tips here to try it out by yourself:
So, I will try to give you some tips here to try it out by yourself:
- 10K resistor must be connected between 1st (reset) pin and 7th (Vcc) of the Atmega328 micro controller.
- 16MHz crystal oscillator must be connected at pins 9 and 10, labeled as XTAL1 and XTAL2
- Connect to each pin of oscillator one 22pF capacitor. The other pin of capacitors goes to pin 8 (GND) of micro controller.
- Remember to connect the second power line of the ATmega328 with your power source, pins 20-Vcc and 22-GND.
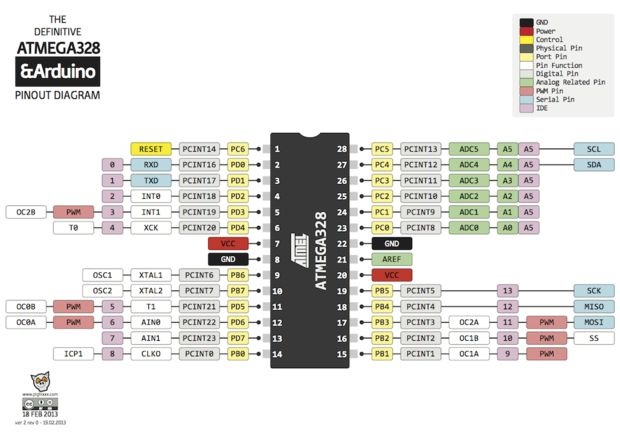
- All other information for the Arduino pinout can be found at the second image above.
- Use the LM7805 with two 0.22uF electrolytic capacitors (on input and output pins) to take 5V from your 12V power source. This is important! Do not provide more than 6V on your custom circuit!!! It will burn your Atmega micro controller and lcd circuit.
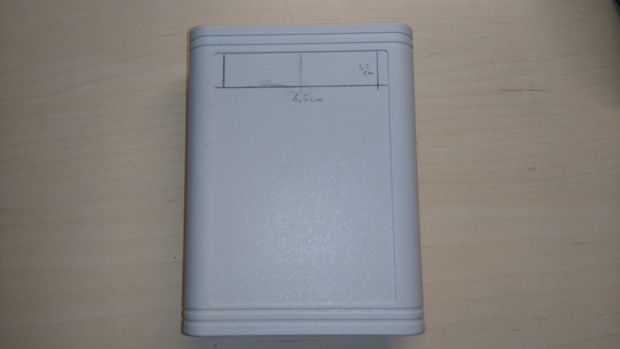
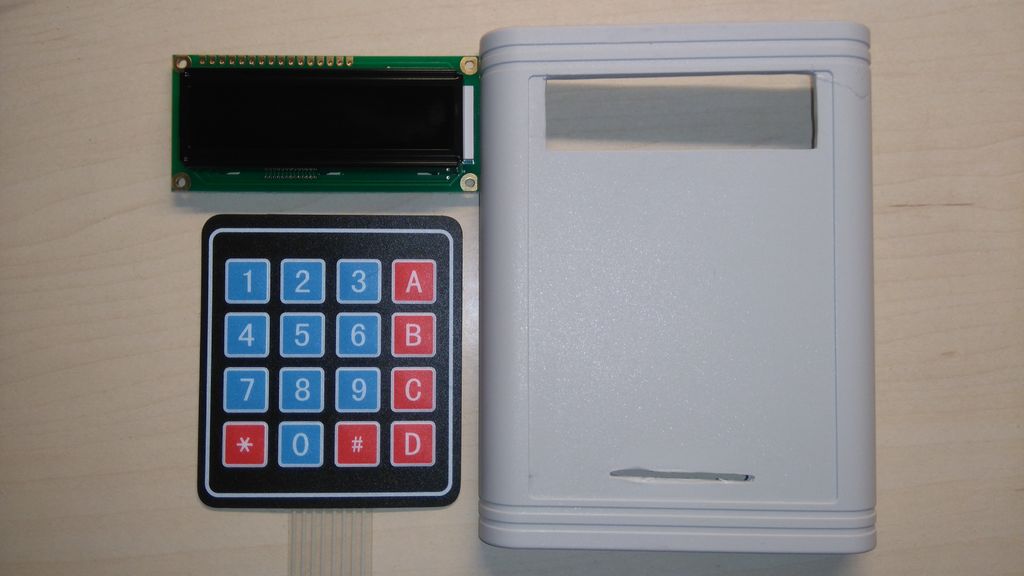
Put it in a box
|
|
|
|
Take your time and configure your box to fit your circuit.
You can make it as big (or small) you want. |
|
Well done!
That's it! You have successfully completed this guide and now you have your own Arduino security system with password. I hope you liked this, let me know in the comments!


