
|
Available Languages
|

|

|
Εισαγωγή
|
Published date: 28/11/2018
|

|
Σε αυτόν τον οδηγό DIY θα δείτε πως μπορείτε να φτιάξετε το δικό σας ασύρματο μετεωρολογικό σταθμό. Στο συγκεκριμένο project αποφάσισα να φτιάξω το δικό μου PCB που βασίζεται στον μικροελεγκτή του Arduino UNO - Atmega328p.
Παρακάτω θα βρείτε το ηλεκτρονικό σχέδιο αλλά και το PCB έτσι ώστε να μπορέσετε εύκολα να το παραγγείλετε. Μπορείτε να ολοκληρώσετε το project με το Arduino UNO και να φτιάξετε το κύκλωμα σας πάνω σε ενα breadboard. |
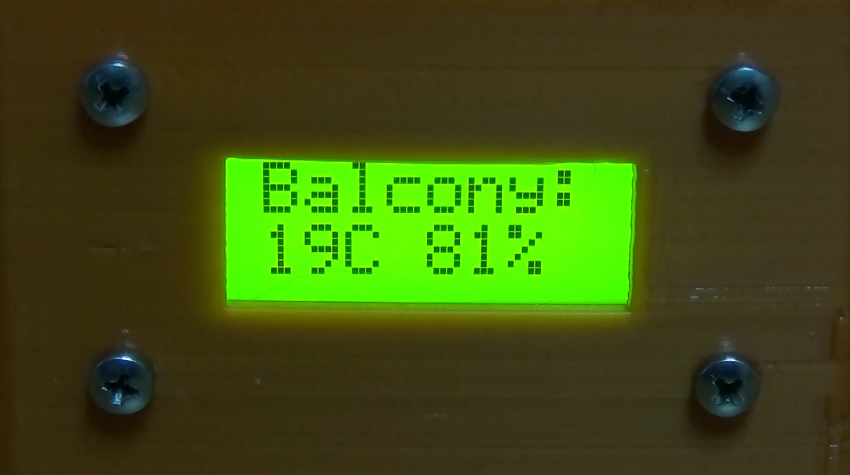
Ο "Master Station" επικοινωνεί ασύρματα μέσω RF με τα αισθητήρια "Sensor (Slave) Station" και εμφανίζει τις τιμές τους ανα 5 δευτερόλεπτα. Ανα 5 δευτερόλεπτα διαβάζουν και τα "Sensor Stations" τα αισθητήρια τους. Οι χρόνοι αυτοί μπορούν να αλλάξουν εύκολα στον κώδικα που θα βρείτε παρακάτω. Το πρωτόκολλο επικοινωνίας που έχουμε φτιάξει μπορεί να διαβάσει μέχρι και 16 συσκευές.


Τα υλικά που θα χρειαστούμε
Τροφοδοσία 5V, εμείς χρησιμοποιήσαμε ενα καλώδιο usb ώστε να μπορούμε εύκολα να δώσουμε ενέργεια μέσω μιας θύρας Η/Υ, φορτιστή κινητού ή ακόμα και power bank.
Επίσης θα χρειαστούμε ενα TTL to USB module ή ένα Arduino UNO για τον προγραμματισμό του.
Το κύκλωμα στο EasyEDA

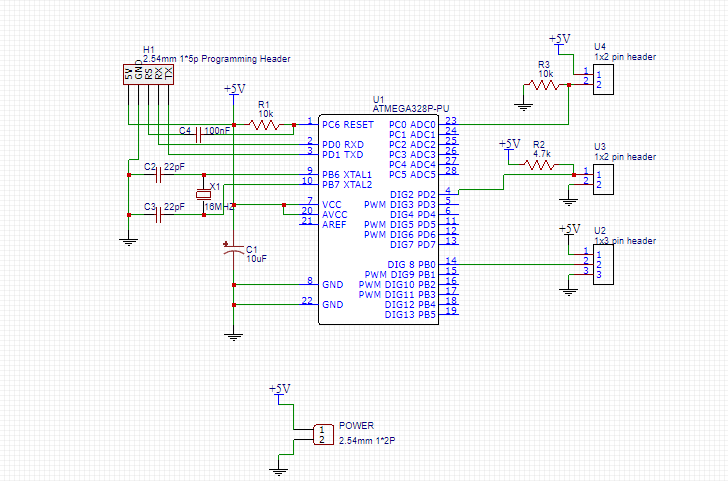
Master Circuit
|
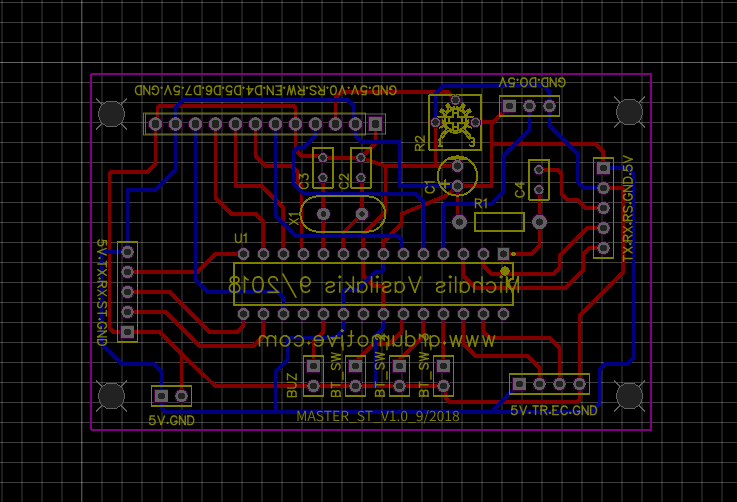
PCB Master
|
Slave Circuit
|
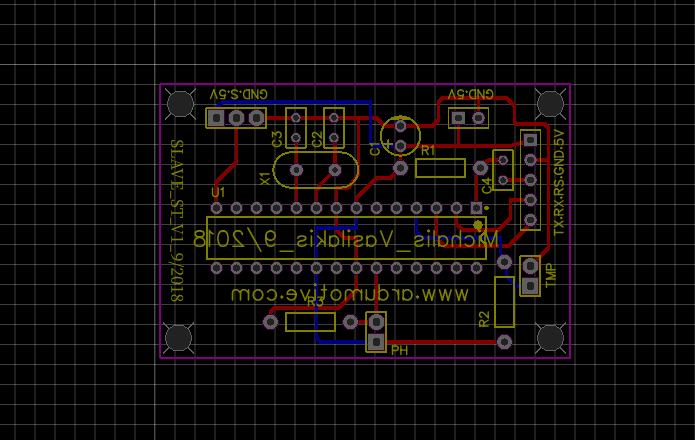
PCB Slave
|
|
|
Το EasyEDA είναι ένα δωρεάν εργαλείο σχεδίασης κυκλωμάτων το οποίο δεν απαιτεί καμία απολύτως εγκατάσταση απ' τον χρήστη, καθώς τρέχει online. Έχει σχεδιαστεί έτσι ώστε να μπορεί να δώσει μια πολύ πιο εύκολη εμπειρία χρήσης σε ηλεκτρονικούς μηχανικούς, διδάσκοντες, μαθητές αλλά και απλούς χρήστες, πάνω στην σχεδίαση ηλεκτρονικών κυκλωμάτων. Είναι πολύ εύκολο να σχεδιάσεις τα κυκλώματα σου μέσα απ' το circuit design, να τα προσομοιώσεις μέσα απ' το circuit simulator και τέλος να τα εξάγεις σε μορφή PCB έτοιμα προς εκτύπωση, και όλα αυτά μέσα απ' το παράθυρο του browser σου!
|
Το κύκλωμα
|
--> Για το Master Station
LCD
DHT Sensor
HC-12
|
--> Για το Slave/Sensor Station
DHT Sensor
DS18B20 Sensor
Photocell
|


Ο κώδικας
Συνδέουμε το TTL to USB module με το programming header όπως φαίνεται στο σχηματικό.
Σημείωση: Στην περίπτωση που χρησιμοποιείτε το Arduino UNO για τον προγραμματισμό του θα πρέπει να αφαιρέσετε τον ATmega328 και να συνδέσετε τα RX και TX pins του header στα RX και TX pins αντίστοιχα του UNO. Επίσης το RS pin θα πρέπει να συνδεθεί στο reset pin του Arduino.
Σημείωση: Στην περίπτωση που χρησιμοποιείτε το Arduino UNO για τον προγραμματισμό του θα πρέπει να αφαιρέσετε τον ATmega328 και να συνδέσετε τα RX και TX pins του header στα RX και TX pins αντίστοιχα του UNO. Επίσης το RS pin θα πρέπει να συνδεθεί στο reset pin του Arduino.
Master
/***CONFIGURATION ****/
const long interval = 5000; // ms
const int slaves = 1; //Number of slaves (max 16) (go to line 95 and complete the if statement for every sensor) /*********************/
const long interval = 5000; // ms
const int slaves = 1; //Number of slaves (max 16) (go to line 95 and complete the if statement for every sensor) /*********************/
1 2 3 4 5 6 7 8 9 10 11 12 13 14 15 16 17 18 19 20 21 22 23 24 25 26 27 28 29 30 31 32 33 34 35 36 37 38 39 40 41 42 43 44 45 46 47 48 49 50 51 52 53 54 55 56 57 58 59 60 61 62 63 64 65 66 67 68 69 70 71 72 73 74 75 76 77 78 79 80 81 82 83 84 85 86 87 88 89 90 91 92 93 94 95 96 97 98 99 100 101 102 103 104 105 106 107 108 109 110 111 112 113 114 115 116 117 118 | /* * Weather Station - Arduino Based by Ardumotive.com * Code for Master Unit - More info can be found at http://www.ardumotive.com/workshop.html * Dev: Michalis Vasilakis // Ver 1.0 // Date: 20/11/2018 */ /***CONFIGURATION ****/ const long interval = 5000; // ms const int slaves = 1; //Number of slaves (max 16) (go to line 95 and complete the if statement for every sensor) /*********************/ //Libraries #include <LiquidCrystal.h> #include <SoftwareSerial.h> #include "DHT.h" //DHT Sensor #define DHTPIN 2 #define DHTTYPE DHT22 DHT dht(DHTPIN, DHTTYPE); //LCD 16x2 Pinout #define RS 3 #define EN 4 #define D4 5 #define D5 6 #define D6 7 #define D7 11 LiquidCrystal lcd(RS,EN,D4,D5,D6,D7); SoftwareSerial sSerial(8, 9); // RX, TX //Variables int temp=0; int hum=0; char incomingByte; String command; boolean messageCompleted=false; boolean newMessage=false; unsigned long previousMillis = 0; int next=0; void setup() { Serial.begin(9600); sSerial.begin(9600); lcd.begin(8,2); lcd.print("Weather"); lcd.setCursor(0,1); lcd.print("Station"); } void loop() { requestFromSlaves(); communication(); } void requestFromSlaves(){ unsigned long currentMillis = millis(); if (currentMillis - previousMillis >= interval) { previousMillis = currentMillis; if(next<slaves){ String msg = "<D"+String(next,HEX)+">"; sSerial.write(msg.c_str()); next++; } else{ readDHT(); //Read the sensor of the 'Master Station' next=0; } } } void communication(){ if (sSerial.available()){ incomingByte = sSerial.read(); if(incomingByte=='>'){ messageCompleted=true; newMessage=false; } else if (incomingByte=='<'){ newMessage=true; } if (newMessage){ command.concat(incomingByte); } } if(messageCompleted){ if (command.charAt(1)=='S'){ if (command.charAt(2)=='0'){ //<--- 0 is the number of slave sensor station address String msg = command.substring(3); lcd.clear(); lcd.print("Balcony:"); //Change line 1 text lcd.setCursor(0,1); lcd.print(msg); } // Config for more sensors: /* else if (command.charAt(2)=='1'){ //<--- 1 is the number of slave sensor station address String msg = command.substring(3); lcd.clear(); lcd.print("My room:"); //Change line 1 text lcd.setCursor(0,1); lcd.print(msg); } */ } command=""; messageCompleted=false; } } void readDHT(){ hum = dht.readHumidity(); temp = dht.readTemperature(); String msg = String(temp) + "C " + String(hum) + "%"; lcd.clear(); lcd.print("Here..."); lcd.setCursor(0,1); lcd.print(msg); } |
Slave
/***CONFIGURATION ****/
const long interval = 5000; // ms
String ADDR = "0"; //Device address from 0 to f
#define SENSOR_TYPE 1 // Type of sensor in slave unit. Can be 1 for DHT, 2 for DS18B20 or 3 for PHOTOCELL
/*********************/
const long interval = 5000; // ms
String ADDR = "0"; //Device address from 0 to f
#define SENSOR_TYPE 1 // Type of sensor in slave unit. Can be 1 for DHT, 2 for DS18B20 or 3 for PHOTOCELL
/*********************/
1 2 3 4 5 6 7 8 9 10 11 12 13 14 15 16 17 18 19 20 21 22 23 24 25 26 27 28 29 30 31 32 33 34 35 36 37 38 39 40 41 42 43 44 45 46 47 48 49 50 51 52 53 54 55 56 57 58 59 60 61 62 63 64 65 66 67 68 69 70 71 72 73 74 75 76 77 78 79 80 81 82 83 84 85 86 87 88 89 90 91 92 93 94 95 96 97 98 99 100 101 102 103 104 105 106 107 108 109 110 111 112 113 114 115 116 117 118 119 120 121 122 123 124 125 126 | /* * Weather Station - Arduino Based by Ardumotive.com * Code for Slave Sensor Unit with DHT sensor * More info can be found at http://www.ardumotive.com/workshop.html * Dev: Michalis Vasilakis // Ver 1.0 // Date: 20/11/2018 */ /***CONFIGURATION ****/ const long interval = 5000; // ms String ADDR = "0"; //Device address from 0 to f #define SENSOR_TYPE 1 // Type of sensor in slave unit. Can be 1 for DHT, 2 for DS18B20 or 3 for PHOTOCELL /*********************/ //Libraries #include "DHT.h" #include <OneWire.h> #include <DallasTemperature.h> //DHT Sensor #define DHTPIN 8 #define DHTTYPE DHT22 // Change "DHT22" only if you are using a different DHT sensor (!). eg DHT11 DHT dht(DHTPIN, DHTTYPE); //DS18B20 #define ONE_WIRE_BUS 2 OneWire oneWire(ONE_WIRE_BUS); DallasTemperature sensors(&oneWire); //Photocell #define PHOTOCELL A0 //Variables int temp=0; int hum=0; String res; char incomingByte; String command; boolean messageCompleted=false; boolean newMessage=false; String fromSensor; unsigned long previousMillis = 0; void setup() { Serial.begin(9600); switch (SENSOR_TYPE) { case 1: dht.begin(); break; case 2: sensors.begin(); break; case 3: break; } } void loop() { communication(); switch (SENSOR_TYPE) { case 1: readDHT(); break; case 2: readDS18B20(); break; case 3: readPhotocell(); break; } } void readDHT(){ unsigned long currentMillis = millis(); if (currentMillis - previousMillis >= interval) { previousMillis = currentMillis; hum = dht.readHumidity(); temp = dht.readTemperature(); fromSensor = "<S"+ADDR+String(temp) + "C " + String(hum) + "%>"; } } void readDS18B20(){ unsigned long currentMillis = millis(); if (currentMillis - previousMillis >= interval) { previousMillis = currentMillis; sensors.requestTemperatures(); temp = sensors.getTempCByIndex(0); fromSensor = "<S"+ADDR+ "Temp " + "C>"; } } void readPhotocell(){ unsigned long currentMillis = millis(); if (currentMillis - previousMillis >= interval) { previousMillis = currentMillis; int photocellReading = analogRead(PHOTOCELL); if (photocellReading < 10) { res = "Dark"; } else if (photocellReading < 200) { res = "Dim"; } else if (photocellReading < 500) { res = "Light"; } else if (photocellReading < 800) { res = "Bright"; } fromSensor = "<S"+ADDR + res+">"; } } void communication(){ if (Serial.available()){ incomingByte = Serial.read(); if(incomingByte=='>'){ messageCompleted=true; newMessage=false; } else if (incomingByte=='<'){ newMessage=true; } if (newMessage){ command.concat(incomingByte); } } if(messageCompleted){ if (command.charAt(1)=='D'){ if (command.substring(2)==ADDR){ Serial.print(fromSensor); } } command=""; messageCompleted=false; } } |
|
Κατεβάστε τον κώδικα απ' εδώ και ανοίξτε το αρχείο με το Arduino IDE. Μέσα θα βρείτε όλες τις απαραίτητες βιβλιοθήκες.
|
| ||
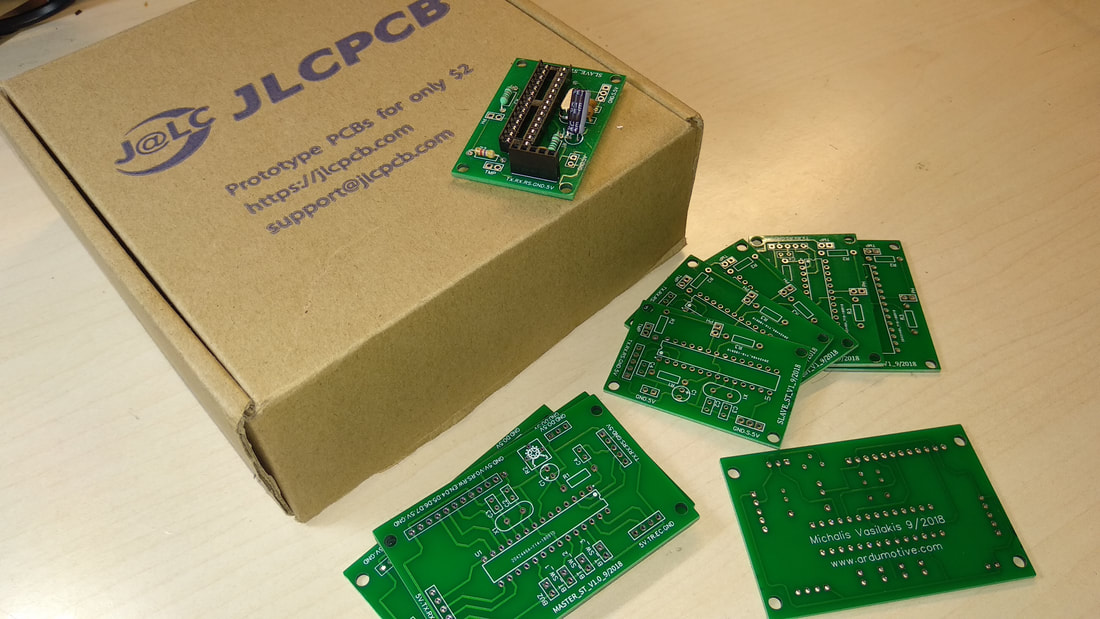
JLCPCB - Φτιάξε το δικό σου κύκλωμα από 2$!
Μπείτε εδώ για να υλοποιήσετε τη δική σας PCB πλακέτα!
Χρησιμοποιήστε το JLCPCB, η ποιότητα είναι πολύ καλή, δείτε την παρακάτω φωτογραφία της δικής μας PCB πλακέτας. Μας κόστισε 2$ για 5 κομμάτια (+τα μεταφορικά)
Χρησιμοποιήστε το JLCPCB, η ποιότητα είναι πολύ καλή, δείτε την παρακάτω φωτογραφία της δικής μας PCB πλακέτας. Μας κόστισε 2$ για 5 κομμάτια (+τα μεταφορικά)
|
| ||||
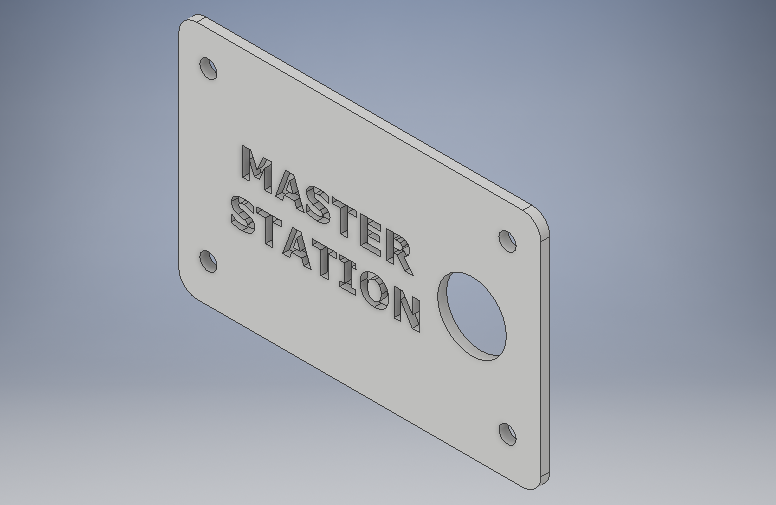
3D Σχέδια

Master A
|
Master B
|

Slave A
|

Slave B
|
| 3dfiles.zip |


Συγχαρητήρια!
Μόλις ολοκληρώσατε άλλον έναν οδηγό . Ελπίζω να σας άρεσε, περιμένω τα σχόλια σας και φωτογραφίες της κατασκευής σας παρακάτω.


