
|
Available Languages
|

|

|
Introduction
|
Published date: 07/1/2020
|
|
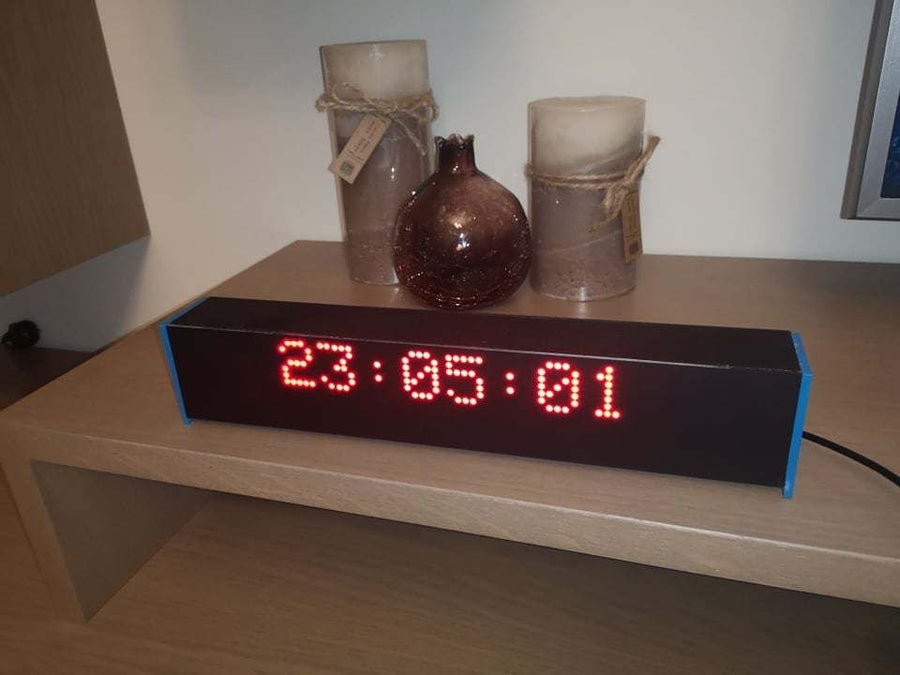
In this guide I will show you how to make your own Arduino LED Matrix display!
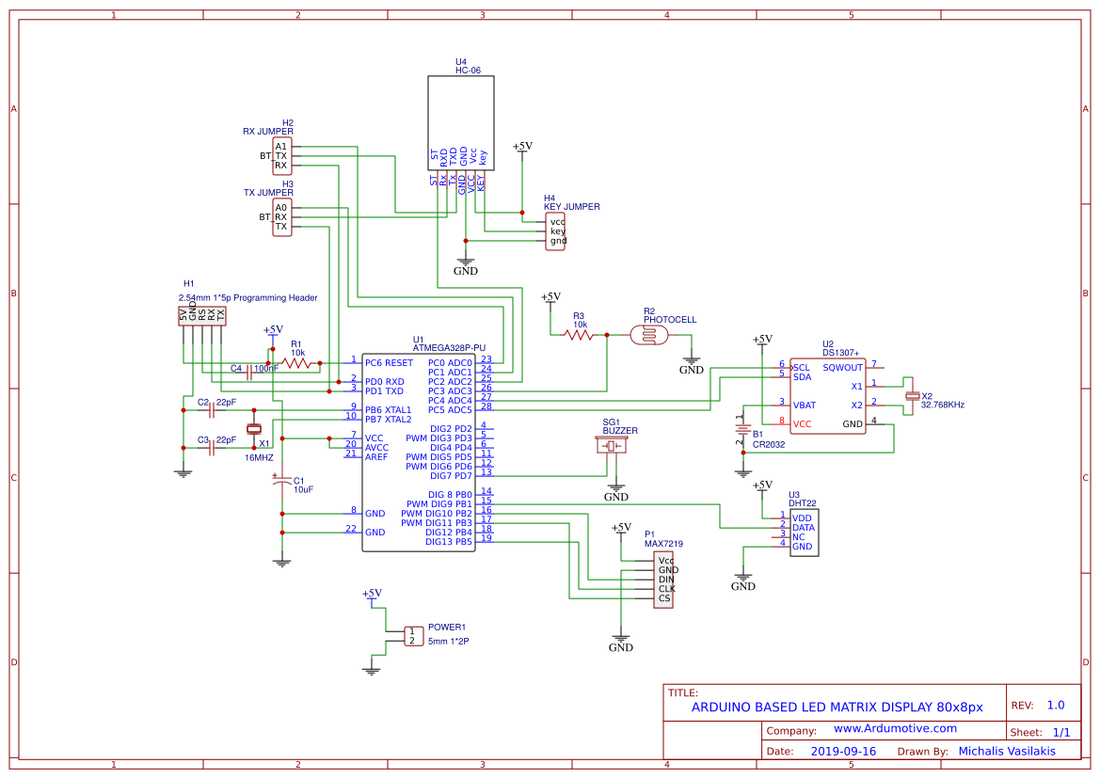
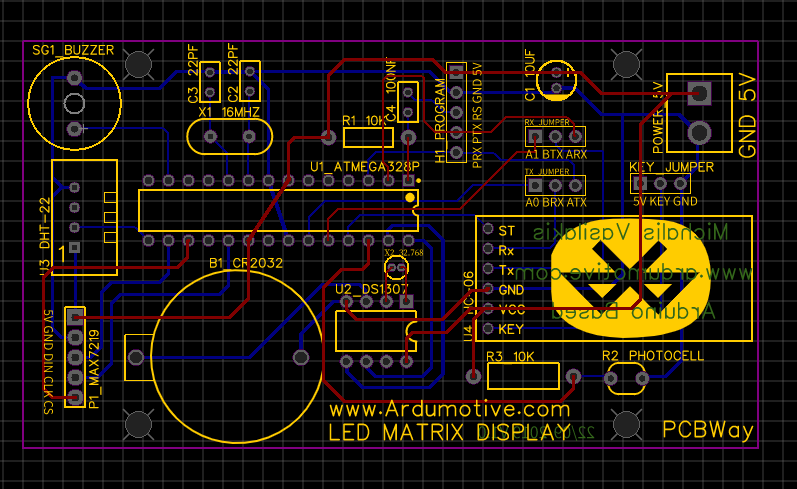
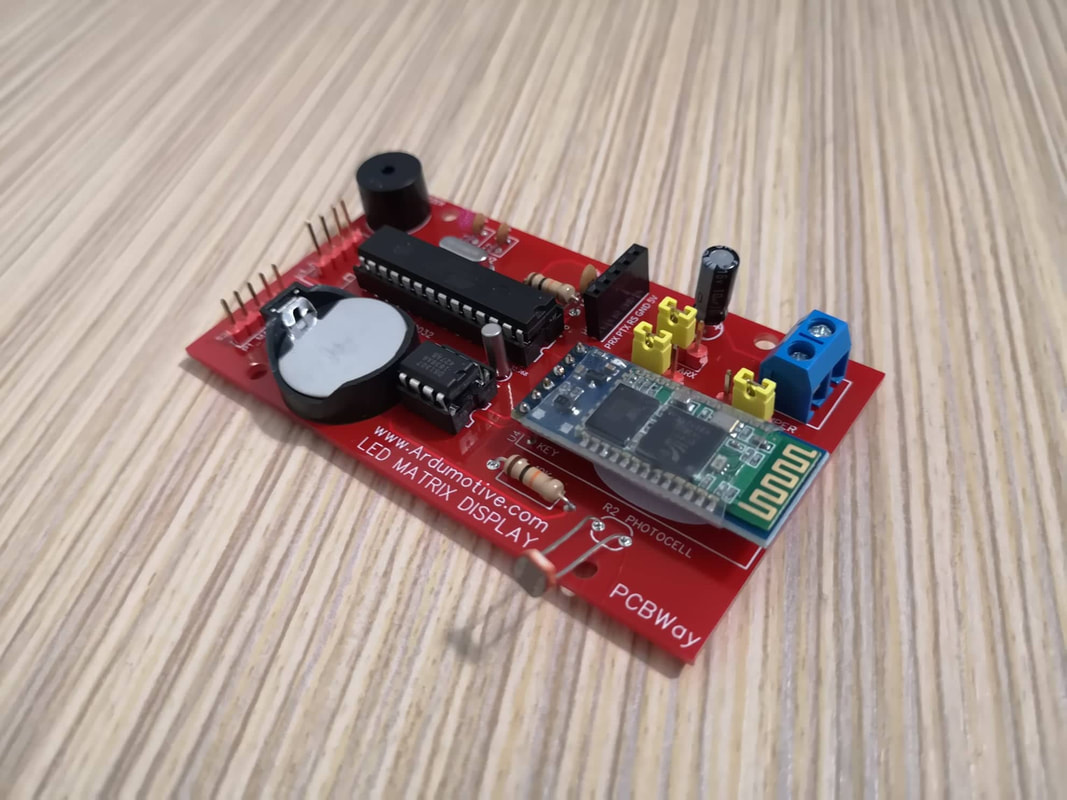
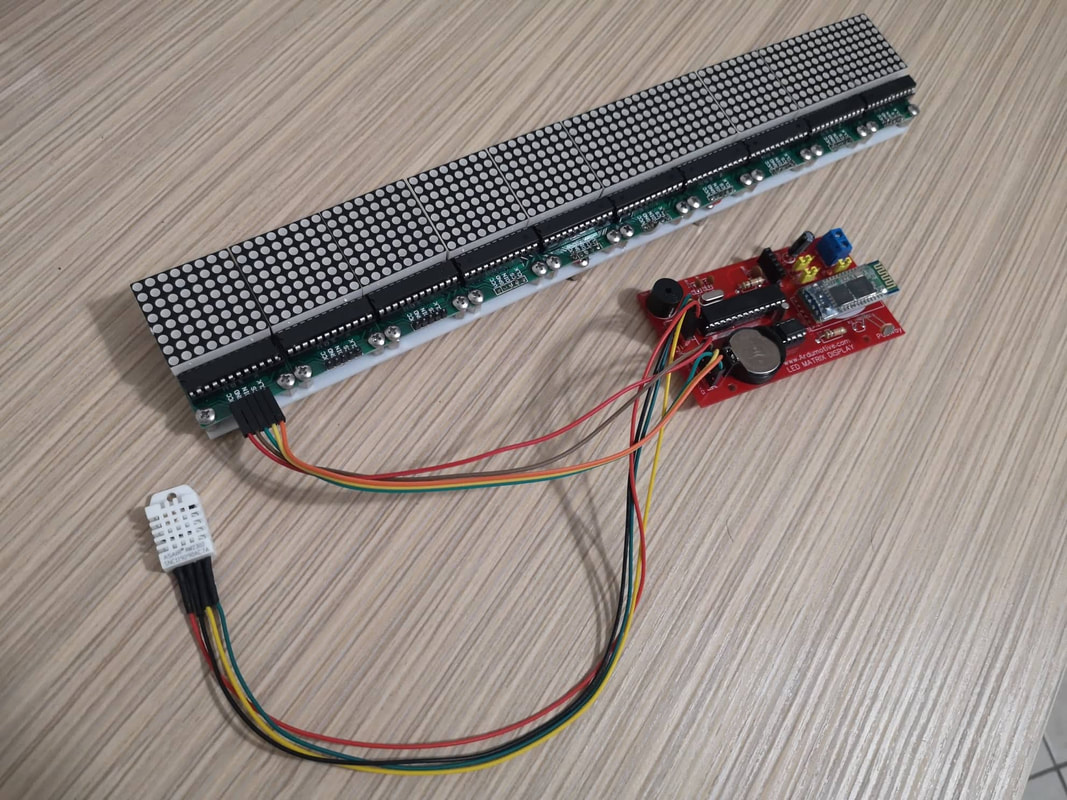
In this project I decided to make my own PCB that is based on Arduino UNO microcontroller - Atmega328p. Bellow you will find the electronic schematic with PCB layout so you can easily produce it. |
|
Display Features:
|

|
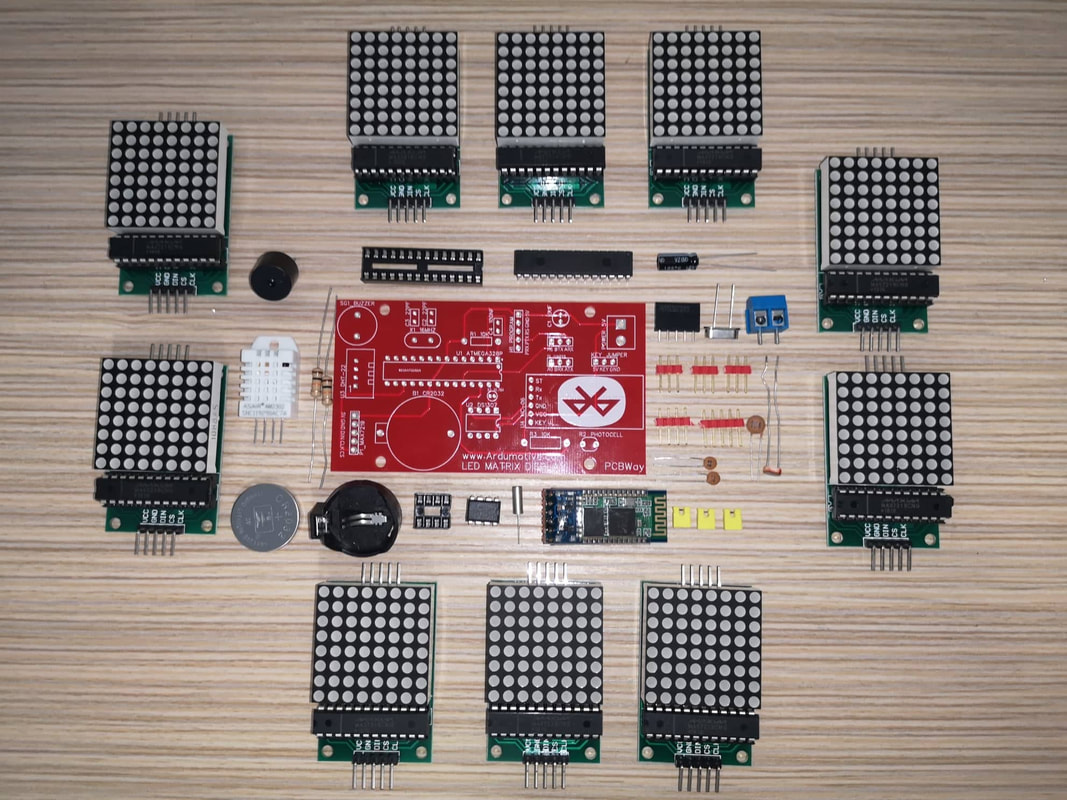
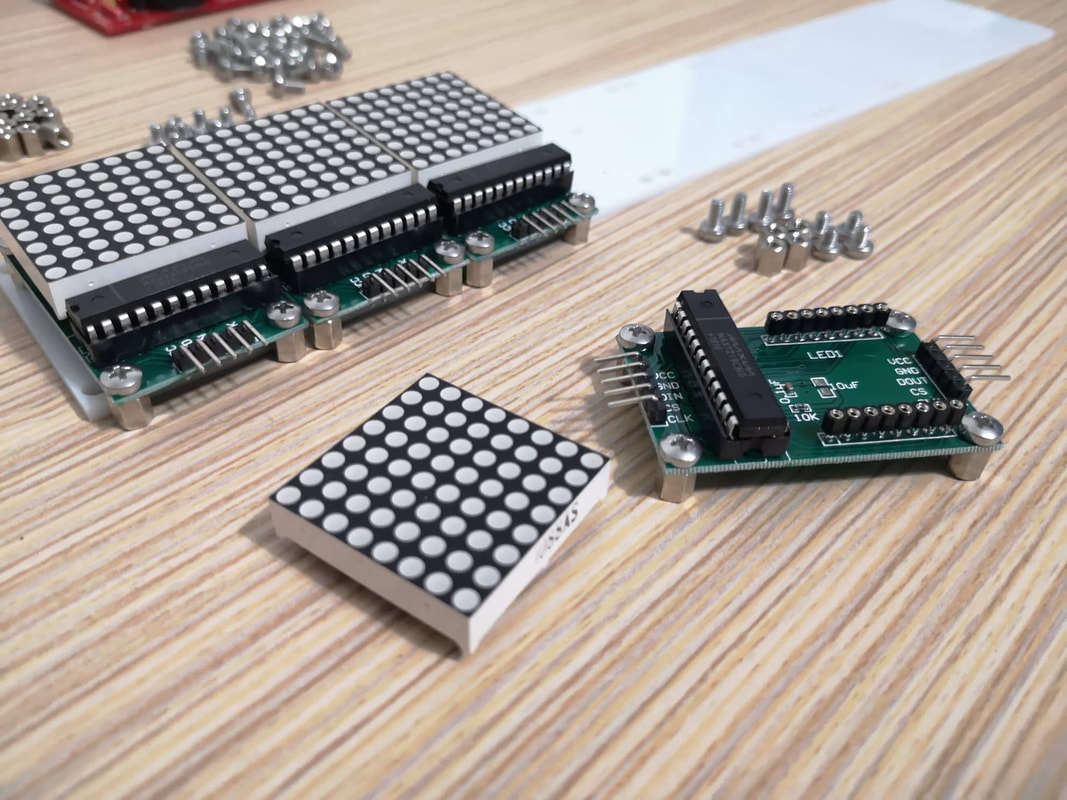
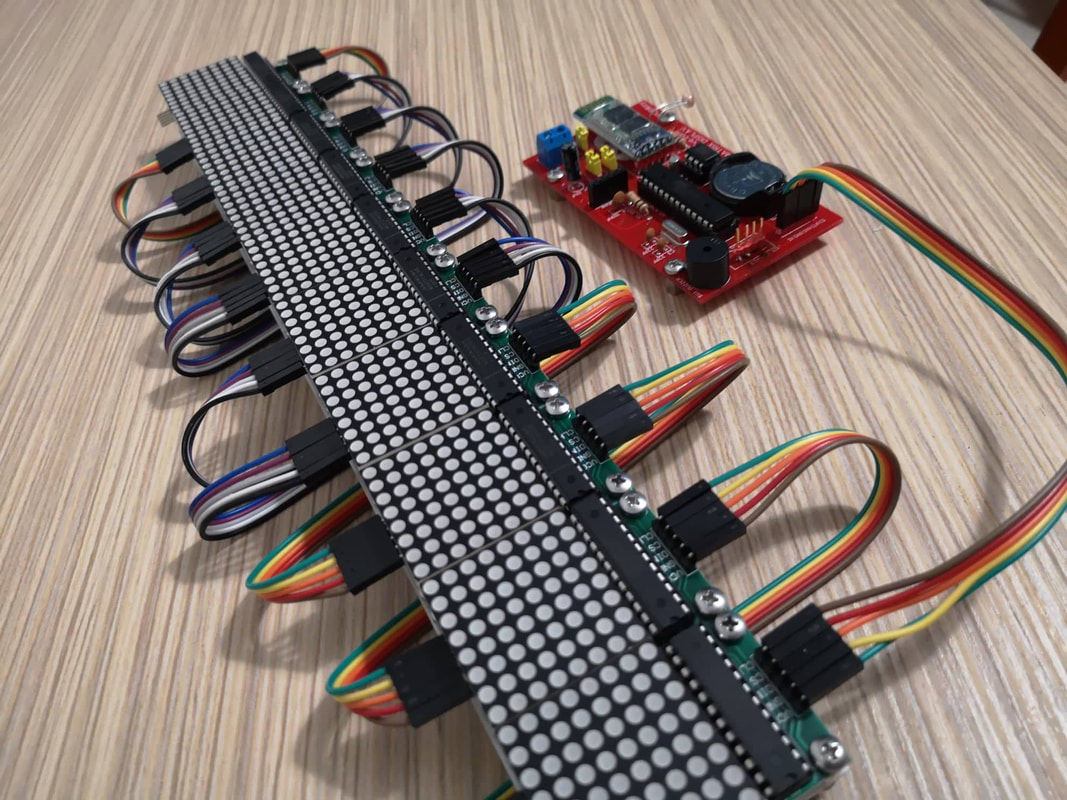
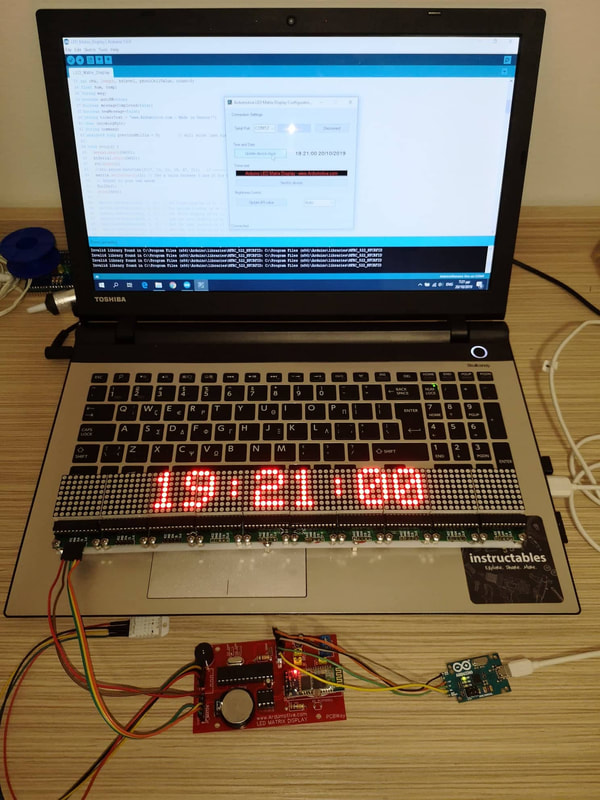
The board is specially design for up to 10 led matrix displays with MAX7219 IC. You can display the time and date (DS1307 RTC IC), temperature and humidity (DHT-22), change the brightness (15 levels or auto via photocell) and scroll a text message.
We have developed an android and windows application to update time/date, brightness and text message via Bluetooth connectivity. The text and brightness value are stored in EEPROM memory, that means that every time that you will turn off/on the unit, these variables will be loaded from memory.
We have developed an android and windows application to update time/date, brightness and text message via Bluetooth connectivity. The text and brightness value are stored in EEPROM memory, that means that every time that you will turn off/on the unit, these variables will be loaded from memory.

|
|
Assembly Video:
We are supporting the open hardware - software community so this project will be marked as an open-source. Before share/copy/change anything of below guide, make sure to read and agree with the CC BY-NC-SA licence agreement! Many thanks to the developers of all Arduino Libraries!
What you will need - Hardware
Circuit Schematic
|
|
Order it from pcbway.com and get 10pcs PCB for free! (only for new members). Instructions on how to order it can be found in the video.
You can also make your changes here.
You can also make your changes here.
| led_matrix_gerber_pcb.zip |
The code

1 2 3 4 5 6 7 8 9 10 11 12 13 14 15 16 17 18 19 20 21 22 23 24 25 26 27 28 29 30 31 32 33 34 35 36 37 38 39 40 41 42 43 44 45 46 47 48 49 50 51 52 53 54 55 56 57 58 59 60 61 62 63 64 65 66 67 68 69 70 71 72 73 74 75 76 77 78 79 80 81 82 83 84 85 86 87 88 89 90 91 92 93 94 95 96 97 98 99 100 101 102 103 104 105 106 107 108 109 110 111 112 113 114 115 116 117 118 119 120 121 122 123 124 125 126 127 128 129 130 131 132 133 134 135 136 137 138 139 140 141 142 143 144 145 146 147 148 149 150 151 152 153 154 155 156 157 158 159 160 161 162 163 164 165 166 167 168 169 170 171 172 173 174 175 176 177 178 179 180 181 182 183 184 185 186 187 188 189 190 191 192 193 194 195 196 197 198 199 200 201 202 203 204 205 206 207 208 209 210 211 212 213 214 215 216 217 218 219 220 221 222 223 224 225 226 227 228 229 230 231 232 233 234 235 236 237 238 239 240 241 242 243 244 245 246 247 248 249 250 251 252 253 254 255 256 257 258 259 260 261 262 263 264 265 266 267 268 269 270 271 272 273 274 275 276 277 278 279 280 281 282 283 284 285 286 287 288 289 290 291 292 293 294 295 296 297 298 299 300 301 302 303 304 305 306 307 308 309 310 311 312 313 314 315 316 317 318 319 320 321 322 323 324 325 326 327 328 329 330 331 332 333 334 335 336 337 338 339 340 341 342 343 344 345 346 347 348 349 350 351 352 353 354 355 356 357 358 359 360 361 362 363 364 365 366 367 368 369 370 371 372 373 374 375 376 | /* Arduino LED Matrix Display - 10x MAX7219 8x8 display-modules * * Pixels 80x8 - Digital Clock - Thermometer - Ticker * * Dev: Michalis Vasilakis - Date: 19/10/19 - Ver. 2.0 * * Time, Date, Ticker Text and brightness level can be controlled * * from bluetooth module and computer-android application */ //Libraries #include <SPI.h> #include <Adafruit_GFX.h> #include <Max72xxPanel.h> #include <dht.h> #include <Wire.h> #include <RTClib.h> #include <SoftwareSerial.h> #include <EEPROM.h> //Constants SoftwareSerial btSerial(A1, A0); // RX, TX const int bt_state = A2; const int photoCell = A3; dht DHT; const int DHT22_PIN = 9; // Data pin of DHT 22 (AM2302) RTC_DS1307 rtc; char daysOfTheWeek[7][12] = {"Sunday","Monday", "Tuesday", "Wednesday", "Thursday", "Friday", "Saturday"}; const int pinCS = 10; // Attach CS to this pin, DIN to MOSI and CLK to SCK (cf http://arduino.cc/en/Reference/SPI ) const int numberOfHorizontalDisplays = 10; const int numberOfVerticalDisplays = 1; const int wait = 20; // In milliseconds const int spacer = 1; const int width = 5 + spacer; // The font width is 5 pixels Max72xxPanel matrix = Max72xxPanel(pinCS, numberOfHorizontalDisplays, numberOfVerticalDisplays); const int buzzer = 7; //Variables int chk, length, brLevel, photoCellValue, count=0; float hum, temp; String msg; boolean autoBR=true; boolean messageCompleted=false; boolean newMessage=false; String tickerText = "www.Ardumotive.com - Made in Greece!"; char incomingByte; String command; unsigned long previousMillis = 0; // will store last time LED was updated boolean flag=false; int RES=0; void setup() { //writeStringEEPROM(10,"AAA"); Serial.begin(9600); brLevel = EEPROM.read(0); autoBR = EEPROM.read(1); tickerText = readStringEEPROM(10); Serial.println("BR LEVEL: "+String(brLevel)); Serial.println("AUTO BR: "+String(autoBR)); Serial.println("TEXT: "+tickerText); btSerial.begin(9600); rtc.begin(); //rtc.adjust(DateTime(2017, 03, 21, 19, 47, 0)); // <----------------------SET TIME AND DATE: YYYY,MM,DD,HH,MM,SS matrix.setIntensity(1); // Use a value between 0 and 15 for brightness // Adjust to your own needs delay(100); /* matrix.setPosition(0, 9, 0); // The first display is at <0, 0> matrix.setPosition(1, 8, 0); // The second display is at <1, 0> matrix.setPosition(2, 7, 0); // The third display is at <2, 0> matrix.setPosition(3, 6, 0); // And the last display is at <3, 0> matrix.setPosition(4, 5, 0); // And the last display is at <3, 0> matrix.setPosition(5, 4, 0); // And the last display is at <3, 0> matrix.setPosition(6, 3, 0); // And the last display is at <3, 0> matrix.setPosition(7, 2, 0); // And the last display is at <3, 0> matrix.setPosition(8, 1, 0); // And the last display is at <3, 0> matrix.setPosition(9, 0, 0); // And the last display is at <3, 0> */ } void(* resetFunc) (void) = 0; void loop() { unsigned long currentMillis = millis(); communication(); //Update thermometer and photoCell variables and on starting if (count==0){ chk = DHT.read22(DHT22_PIN); delay(20); //Read data and store it to variables hum and temp hum = DHT.humidity; temp= DHT.temperature; controlBR(); } //Show content if (currentMillis - previousMillis >= 1000) { previousMillis = currentMillis; count++; //Seconds } //First display the clock for 5sec if (count>=0 && count <5){ time(); flag=false; } //Then the day of the week for 3sec else if (count>=5 && count<7){ if (!flag){ today(); flag=true; } } //Then the date for 3sec else if (count>=7 && count<11){ if (count==7) {flag=false;} if (!flag){ date(); flag=true; } } //Then the temperature for 3sec else if (count>=11 && count<14){ if (count==11) {flag=false;} if (!flag){ temperature(); flag=true; } } //Then the humidity for 3sec else if (count>=14 && count<17){ if (count==14) {flag=false;} if (!flag){ humidity(); flag=true; } } //Finally the ticker text else if (count>=17){ if(tickerText!=""){ scroll(); fullOff(); delay(100); } //RESET ARDUINO -- THIS WILL FIX SOME DISPLAY PROBLEMS if (RES==5){ matrix.shutdown(true); resetFunc(); } RES++; count=0; //<----reset } } //Bluetooth communication void communication(){ if (btSerial.available()){ incomingByte = btSerial.read(); if(incomingByte=='>'){ messageCompleted=true; newMessage=false; } else if (incomingByte=='<'){ newMessage=true; } if (newMessage){ command.concat(incomingByte); } } if(messageCompleted){ //Brightness level if (command.charAt(1)=='B'){ if (command.substring(2)=="Auto"){ autoBR=true; } else{ autoBR=false; brLevel= (command.substring(2)).toInt() - 1; } EEPROM.write(0, brLevel); EEPROM.write(1, autoBR); tone(buzzer,800,500); controlBR(); } //Update clock else if (command.charAt(1)=='T'){ int h = (command.substring(2,4)).toInt(); int m = (command.substring(5,7)).toInt(); int s = (command.substring(8,10)).toInt(); int D = (command.substring(11,13)).toInt(); int M = (command.substring(14,16)).toInt(); int Y = (command.substring(17,21)).toInt(); rtc.adjust(DateTime(Y,M,D,h,m,s)); // <----------------------SET TIME AND DATE: YYYY,MM,DD,HH,MM,SS tone(buzzer,800,500); } //Update ticker text else if (command.charAt(1)=='t'){ tickerText=command.substring(2); tone(buzzer,800,500); writeStringEEPROM(10,tickerText); } command=""; messageCompleted=false; } } void writeStringEEPROM(char addr,String data) { int _size = data.length(); int i; for (i = 0; i < _size; i++) { EEPROM.write(addr + i, data[i]); } EEPROM.write(addr + _size, '\0'); //Add termination null character for String Data } String readStringEEPROM(char add) { int i; char data[500]; //Max 100 Bytes int len=0; unsigned char k; k=EEPROM.read(add); while(k != '\0' && len<500) //Read until null character { k=EEPROM.read(add+len); data[len]=k; len++; } data[len]='\0'; return String(data); } //Control brightness - It will run on every complete loop! void controlBR(){ if (autoBR){ photoCellValue = analogRead(photoCell); Serial.println(photoCellValue); photoCellValue = map(photoCellValue,1023,0,0,15); matrix.setIntensity(photoCellValue); // Use a value between 0 and 15 for brightness } else{ matrix.setIntensity(brLevel); // Use a value between 0 and 15 for brightness } } //Print time void time(){ DateTime now = rtc.now(); int HH = now.hour(); int MM = now.minute(); int SS = now.second(); if (HH<10){ msg = "0" + String(HH) + ":"; } else{ msg = String(HH) + ":"; } if (MM<10){ msg += "0" + String(MM) + ":"; } else{ msg += String(MM) + ":"; } if (SS<10){ msg += "0" + String(SS); } else{ msg += String(SS); } length = msg.length() * width; //fill with blank spaces the rest of the display area for (int i = numberOfHorizontalDisplays*8-length; i>0; i--){ msg += " "; } matrix.setCursor((numberOfHorizontalDisplays*8-length)/2,0); // Center text matrix.fillScreen(LOW); matrix.print(msg); matrix.write(); } //Print day of week void today(){ DateTime now = rtc.now(); //Day of week msg = daysOfTheWeek[now.dayOfTheWeek()]; length = msg.length() * width; //fill with blank spaces the rest of the display area for (int i = 8; i>0; i--){ msg += " "; } matrix.setCursor((numberOfHorizontalDisplays*8-length)/2,0); // Center text matrix.fillScreen(LOW); matrix.print(msg); matrix.write(); } //Print date void date(){ DateTime now = rtc.now(); //Date: int dd = now.day(); int mm = now.month(); int yyyy = now.year(); if (dd<10){ msg = "0" + String(dd) + ":"; } else{ msg = String(dd) + ":"; } if (mm<10){ msg += "0" + String(mm) + ":"; } else{ msg += String(mm) + ":"; } msg += String(yyyy); length = msg.length() * width; //fill with blank spaces the rest of the display area for (int i = 8; i>0; i--){ msg += " "; } matrix.setCursor((numberOfHorizontalDisplays*8-length)/2,0); // Center text matrix.fillScreen(LOW); matrix.print(msg); matrix.write(); } //Print temp and humidity void temperature() { msg = "Temp: " + String(temp) +"oC"; length = msg.length() * width; //fill with blank spaces the rest of the display area for (int i = 8; i>0; i--){ msg += " "; } matrix.setCursor((numberOfHorizontalDisplays*8-length)/2,0); // Center text matrix.fillScreen(LOW); matrix.print(msg); matrix.write(); } void humidity(){ msg = "Hum: " + String(hum) +"%"; length = msg.length() * width; //fill with blank spaces the rest of the display area for (int i = 8; i>0; i--){ msg += " "; } matrix.setCursor((numberOfHorizontalDisplays*8-length)/2,0); // Center text matrix.fillScreen(LOW); matrix.print(msg); matrix.write(); } //Ticker Text void scroll(){ for ( int i = 0 ; i < width * tickerText.length() + matrix.width() - 1 - spacer; i++ ) { matrix.fillScreen(LOW); int letter = i / width; int x = (matrix.width() - 1) - i % width; int y = (matrix.height() - 8) / 2; // center the text vertically while ( x + width - spacer >= 0 && letter >= 0 ) { if ( letter < tickerText.length() ) { matrix.drawChar(x, y, tickerText[letter], HIGH, LOW, 1); } letter--; x -= width; } matrix.write(); // Send bitmap to display delay(wait); } } //Control funcs. for display - Call them in void loop to test the LEDs void fullOn(){ matrix.fillScreen(HIGH); matrix.write(); } void fullOff(){ matrix.fillScreen(LOW); matrix.write(); } |
|
Download the code from here and open it with Arduino IDE. Inside you will also find all necessary libraries.
|
| ||
Photo Gallery


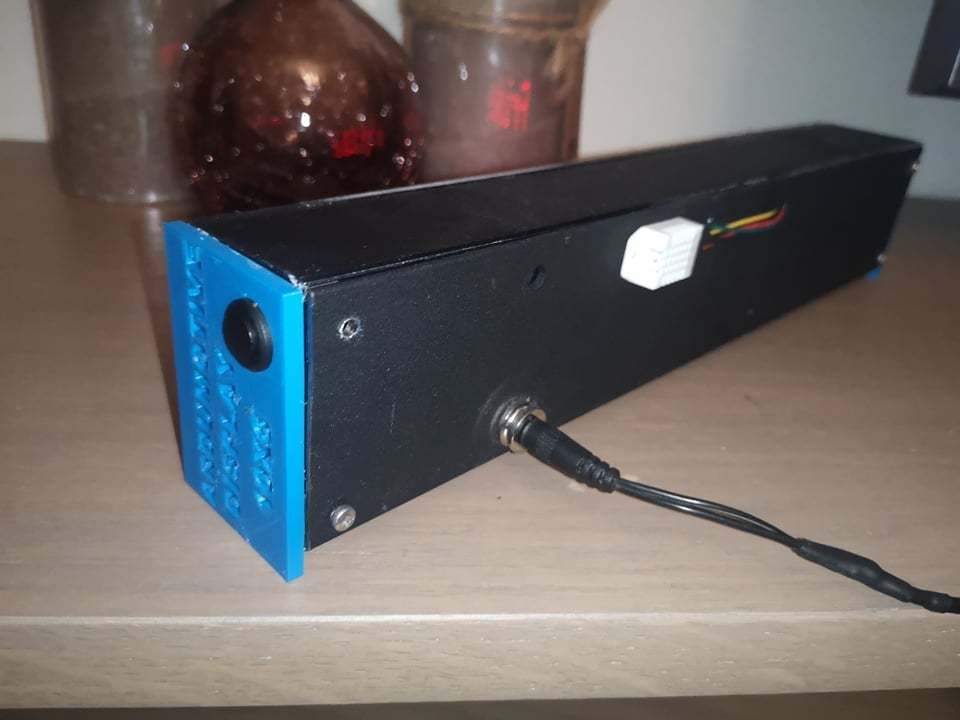
Box
|
Use black - transparent plexiglass, 3mm thickness:
Optional, if you have a 3d printer you can print the left and right side.
|
| ||||||
Software and configuration protocol
|
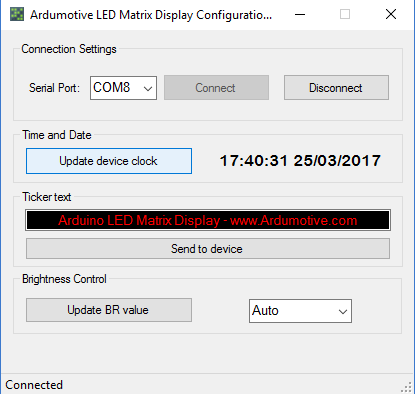
From here you can download the software for windows os. The application for Android devices will be soon available.
If you want you can make your own application, or make an app for a different operation system. Bellow you will find the protocol that we are using. | ||
Configuration protocol:
- For time and date send: <THH:MM:SS dd/mm/yyyy>
- For ticker text send: <tYour Text Here>
- For brightness level send: <BAuto> or <Bvalue> (value from 1 to 16)
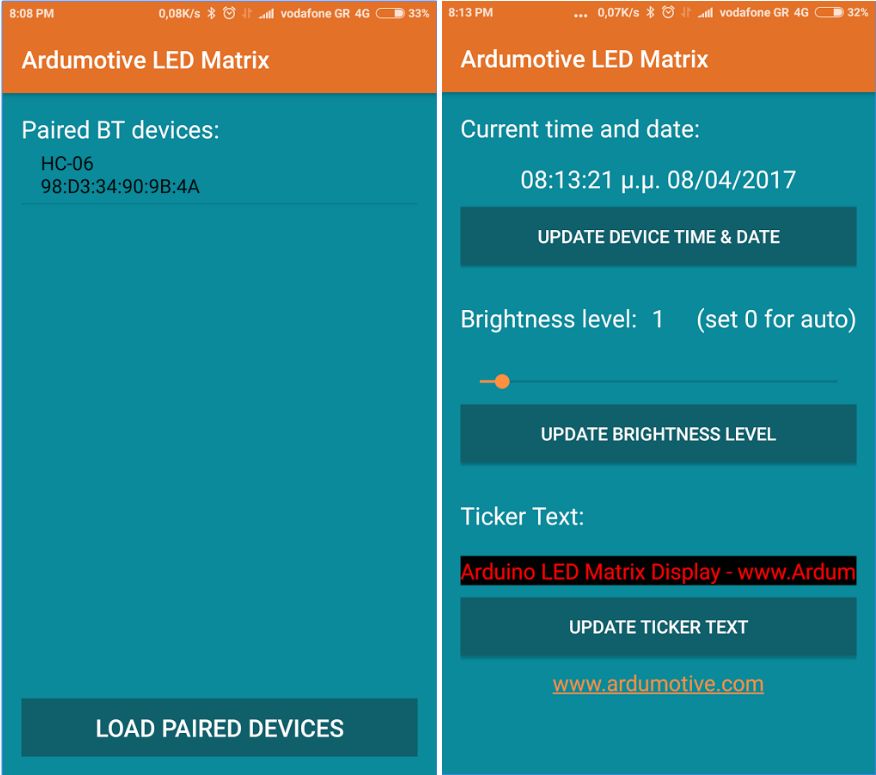
Android Application
|
Features of current version:
-Update time and date with your device clock -Update brightness level -16 available levels (set to 0 for automatic adjustment) -Change the ticker (scrolling) text (set to blank to deactivate it) How to use it: Turn on Bluetooth and pair your display. The default name of the Bluetooth module is "HC-06" or "HC-05" and usually the password is "1234". Now open the application, press the "Load Paired Devices" button and select your BT module. (see also the video) | ||
Note: If you can't establish a connection with your LED Matrix Display, just restart it.
If you have any problem with this application just send me an email.
If you have any problem with this application just send me an email.


