
|
Available Languages
|

|

|
Εισαγωγή |
Published date: 19/11/2016
|
|
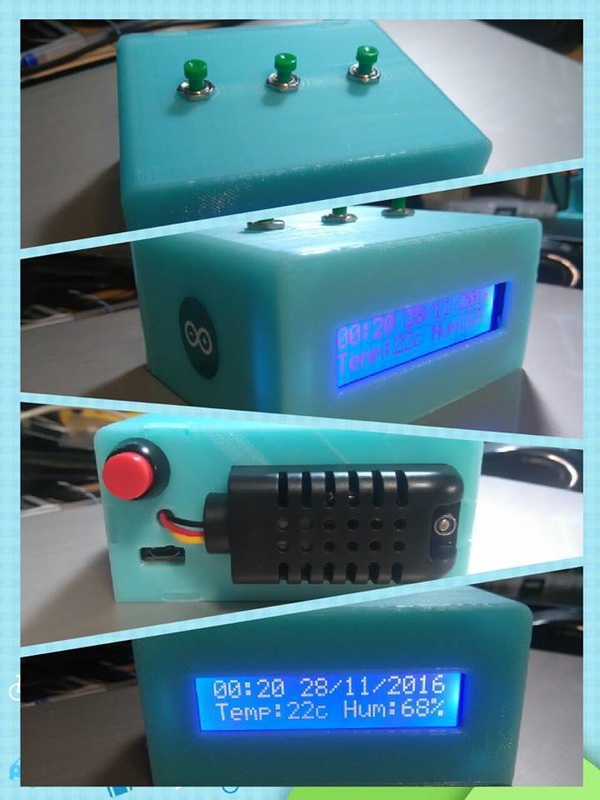
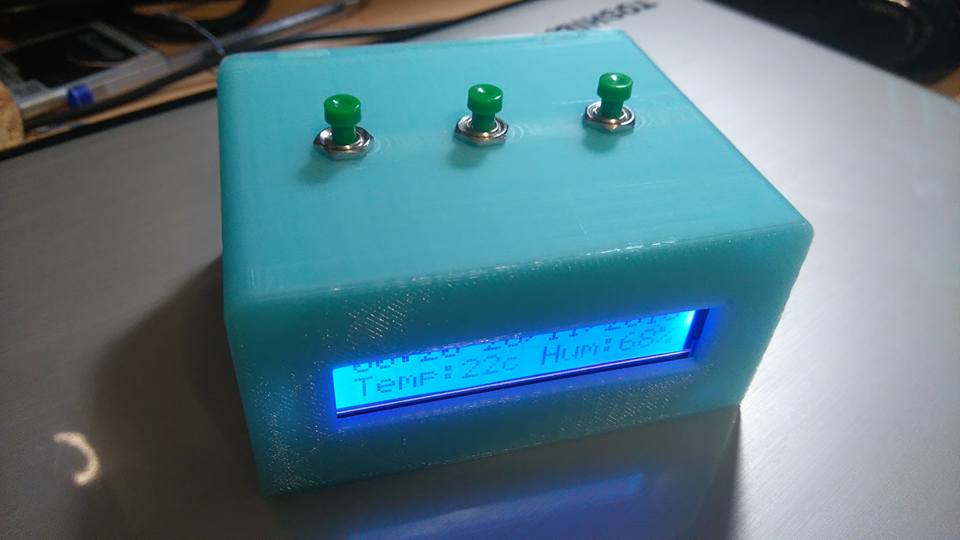
Σε αυτό το tutorial θα σας δείξω πως μπορείτε να φτιάξετε και εσείς ένα ψηφιακό ρολόι - θερμόμετρο με το Arduino Pro mini (φυσικά μπορείτε να χρησιμοποιήσετε οποιοδήποτε Arduino board θέλετε).
Μπορείτε να ρυθμίσετε την τρέχουσα ώρα και ημερομηνία πατώντας τα κουμπιά "Set"-"Up"-"Down". Πατώντας το κουμπί "Down" μπορείτε επίσης να ενεργοποιείτε/απενεργοποιείτε τον φωτισμό της οθόνης. Οι τιμές της ώρας και ημ/νιας αποθηκεύονται στην εσωτερική μνήμη του RTC (real time clock). |
Οι τιμές της θερμοκρασίας και υγρασίας ανανεώνονται κάθε 5 δευτερόλεπτα. Στον οδηγό αυτό χρησιμοποιήσαμε τον αισθητήρα DHT-21, αλλά μπορείτε να κάνετε χρήση και των DHT-11 ή DHT-22 (φυσικά με κάποιες αλλαγές στον παρακάτω κώδικα).
Δείτε το βίντεο:
Δείτε το βίντεο:


Τα υλικά που θα χρειαστούμε - Hardware
|
Για το project αυτό θα χρειαστούμε:
Αν θέλετε μπορείτε να χρησιμοποιήσετε μια επαναφορτιζόμενη μπαταρία και ένα κύκλωμα φόρτισης, όπως έκανα και εγω στο δικό μου ρολόι.
|
|
Ή φυσικά μπορείτε να χρησιμοποιήσετε ένα DC jack και να το τροφοδοτήσετε απευθείας με 5V.
Το κύκλωμα
Το κύκλωμα και η συνδεσμολογία είναι αρκετά απλή. Ναι θα χρειαστεί να κάνετε και κάποιες κολλήσεις.
I2C LCD 16x2:
I2C LCD 16x2:
- Vcc στην τροφοδοσία (μέγιστο 5V!)
- GND στην γείωση -GND
- SDA στο pin A4
- SCL στο pin A5
- Vcc στην τροφοδοσία (μέγιστο 5V!)
- GND στην γείωση - GND
- SDA στο pin A4
- SCL στο pin A5
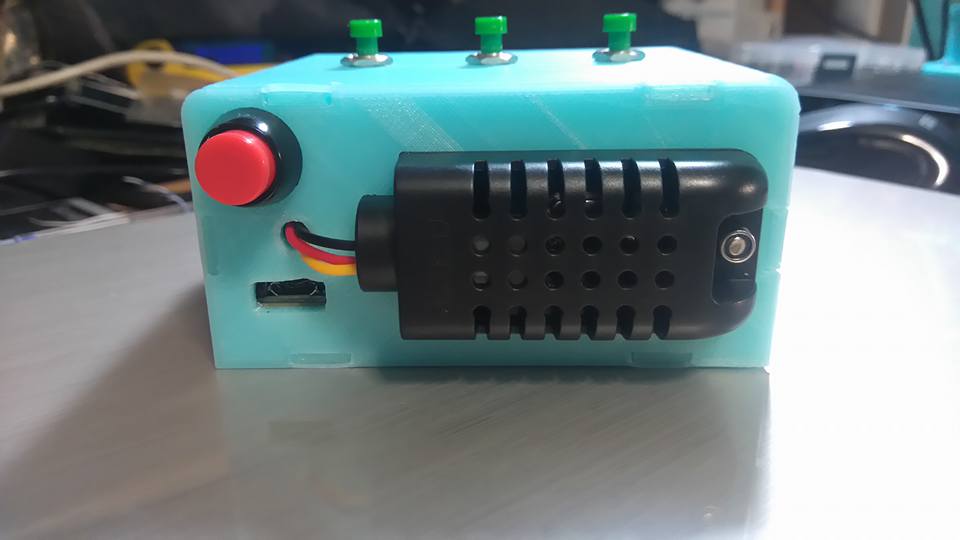
- Το κόκκινο καλώδιο στην τροφοδοσία (μέγιστο 5V!)
- Το μαύρο καλώδιο στην γείωση - GND
- Το κίτρινο καλώδιο στο pin 5
- Το κουμπί "Set" στο pin 8
- Το κουμπί "Up" στο pin 9
- Το κουμπί "Down" στο pin 10
- Ο δεύτερος ακροδέκτης απ' όλα τα κουμπία πάει στην γείωση - GND
Ο κώδικας
1 2 3 4 5 6 7 8 9 10 11 12 13 14 15 16 17 18 19 20 21 22 23 24 25 26 27 28 29 30 31 32 33 34 35 36 37 38 39 40 41 42 43 44 45 46 47 48 49 50 51 52 53 54 55 56 57 58 59 60 61 62 63 64 65 66 67 68 69 70 71 72 73 74 75 76 77 78 79 80 81 82 83 84 85 86 87 88 89 90 91 92 93 94 95 96 97 98 99 100 101 102 103 104 105 106 107 108 109 110 111 112 113 114 115 116 117 118 119 120 121 122 123 124 125 126 127 128 129 130 131 132 133 134 135 136 137 138 139 140 141 142 143 144 145 146 147 148 149 150 151 152 153 154 155 156 157 158 159 160 161 162 163 164 165 166 167 168 169 170 171 172 173 174 175 176 177 178 179 180 181 182 183 184 185 186 187 188 189 190 191 192 193 194 195 196 197 198 199 200 201 202 203 204 205 206 207 208 209 210 211 212 213 214 215 216 217 218 219 220 221 222 223 224 225 226 227 228 229 230 231 232 233 234 235 236 237 238 239 240 241 242 243 244 245 246 247 248 249 250 251 252 253 254 255 256 257 258 259 260 261 262 263 264 265 266 267 268 269 270 271 272 273 274 275 276 277 278 279 280 281 282 283 284 285 286 287 288 289 290 291 292 293 294 295 | /* Clock - Thermometer with Arduino * More info: http://www.ardumotive.com/ * Dev: Michalis Vasilakis Data: 19/11/2016 Ver: 1.0 * * Display 16x2: Setup: * +----------------+ +----------------+ * |HH:MM DD/MM/YYYY| | >HH :>MM | * |Temp:27c Hum:74%| |>DD />MM />YYYY | * +----------------+ +----------------+ */ //Libraries #include <Wire.h> #include <RTClib.h> #include <LiquidCrystal_I2C.h> #include <dht.h> //Init libraries objects RTC_DS1307 rtc; LiquidCrystal_I2C lcd(0x3F, 2, 1, 0, 4, 5, 6, 7, 3, POSITIVE); // Set the LCD I2C address, if it's not working try 0x27. dht DHT; //Constants char daysOfTheWeek[7][12] = {"Sunday","Monday", "Tuesday", "Wednesday", "Thursday", "Friday", "Saturday"}; #define DHT21_PIN 5 // DHT 22 (AM2302) - what pin we're connected to const long interval = 6000; // Read data from DHT every 6 sec const int btSet = 8; const int btUp = 9; const int btDown = 10; //Variables int DD,MM,YY,H,M,S,temp,hum, set_state, up_state, down_state; int btnCount = 0; unsigned long previousMillis = 0; unsigned long currentMillis; String sDD; String sMM; String sYY; String sH; String sM; String sS; boolean backlightON = true; boolean setupScreen = false; void setup () { pinMode(btSet, INPUT_PULLUP); pinMode(btUp, INPUT_PULLUP); pinMode(btDown, INPUT_PULLUP); lcd.begin(16,2); // iInit the LCD for 16 chars 2 lines lcd.backlight(); // Turn on the backligt (try lcd.noBacklight() to turn it off) lcd.clear(); } void loop () { currentMillis = millis(); readBtns(); getTempHum(); getTimeDate(); if (!setupScreen){ lcdPrint(); } else{ lcdSetup(); } } //Read buttons void readBtns(){ set_state = digitalRead(btSet); up_state = digitalRead(btUp); down_state = digitalRead(btDown); //Turn backlight on/off by pressing the down button if (down_state==LOW && btnCount==0){ if (backlightON){ lcd.noBacklight(); backlightON = false; } else{ lcd.backlight(); backlightON = true; } delay(500); } if (set_state==LOW){ if(btnCount<5){ btnCount++; setupScreen = true; if(btnCount==1){ lcd.clear(); lcd.setCursor(0,0); lcd.print("------SET------"); lcd.setCursor(0,1); lcd.print("-TIME and DATE-"); delay(2000); lcd.clear(); } } else{ lcd.clear(); rtc.adjust(DateTime(YY, MM, DD, H, M, 0)); lcd.print("Saving...."); delay(2000); lcd.clear(); setupScreen = false; btnCount=0; } delay(500); } } //Read temperature and humidity every 6 seconds from DHT sensor void getTempHum(){ if (currentMillis - previousMillis >= interval) { int chk = DHT.read21(DHT21_PIN); previousMillis = currentMillis; hum = DHT.humidity; temp= DHT.temperature; } } //Read time and date from rtc ic void getTimeDate(){ if (!setupScreen){ DateTime now = rtc.now(); DD = now.day(); MM = now.month(); YY = now.year(); H = now.hour(); M = now.minute(); S = now.second(); } //Make some fixes... if (DD<10){ sDD = '0' + String(DD); } else { sDD = DD; } if (MM<10){ sMM = '0' + String(MM); } else { sMM = MM; } sYY=YY; if (H<10){ sH = '0' + String(H); } else { sH = H; } if (M<10){ sM = '0' + String(M); } else { sM = M; } if (S<10){ sS = '0' + String(S); } else { sS = S; } } //Print values to the display void lcdPrint(){ lcd.setCursor(0,0); //First row lcd.print(sH); lcd.print(":"); lcd.print(sM); lcd.print(" "); lcd.print(sDD); lcd.print("/"); lcd.print(sMM); lcd.print("/"); lcd.print(sYY); lcd.setCursor(0,1); //Second row lcd.print("Temp:"); lcd.print(temp); lcd.print("c"); lcd.setCursor(9,1); //10 cell of second row lcd.print("Hum:"); lcd.print(hum); lcd.print("%"); } //Setup screen void lcdSetup(){ if (btnCount==1){ lcd.setCursor(4,0); lcd.print(">"); if (up_state == LOW){ if (H<23){ H++; } else { H=0; } delay(500); } if (down_state == LOW){ if (H>0){ H--; } else { H=23; } delay(500); } } else if (btnCount==2){ lcd.setCursor(4,0); lcd.print(" "); lcd.setCursor(9,0); lcd.print(">"); if (up_state == LOW){ if (M<59){ M++; } else { M=0; } delay(500); } if (down_state == LOW){ if (M>0){ M--; } else { M=59; } delay(500); } } else if (btnCount==3){ lcd.setCursor(9,0); lcd.print(" "); lcd.setCursor(0,1); lcd.print(">"); if (up_state == LOW){ if (DD<31){ DD++; } else { DD=1; } delay(500); } if (down_state == LOW){ if (DD>1){ DD--; } else { DD=31; } delay(500); } } else if (btnCount==4){ lcd.setCursor(0,1); lcd.print(" "); lcd.setCursor(5,1); lcd.print(">"); if (up_state == LOW){ if (MM<12){ MM++; } else { MM=1; } delay(500); } if (down_state == LOW){ if (MM>1){ MM--; } else { MM=12; } delay(500); } } else if (btnCount==5){ lcd.setCursor(5,1); lcd.print(" "); lcd.setCursor(10,1); lcd.print(">"); if (up_state == LOW){ if (YY<2999){ YY++; } else { YY=2000; } delay(500); } if (down_state == LOW){ if (YY>2000){ YY--; } else { YY=2999; } delay(500); } } lcd.setCursor(5,0); lcd.print(sH); lcd.setCursor(8,0); lcd.print(":"); lcd.setCursor(10,0); lcd.print(sM); lcd.setCursor(1,1); lcd.print(sDD); lcd.setCursor(4,1); lcd.print("/"); lcd.setCursor(6,1); lcd.print(sMM); lcd.setCursor(9,1); lcd.print("/"); lcd.setCursor(11,1); lcd.print(sYY); } |
|
Κατεβάστε τον κώδικα απ' εδώ και ανοίξτε το αρχείο με το Arduino IDE. Μέσα θα βρείτε όλες τις απαραίτητες βιβλιοθήκες.
|
| ||
Αν αντιμετωπίσετε κάποια δυσκολία με την οθόνη και την διεύθυνση i2c της δείτε αυτό το tutorial.
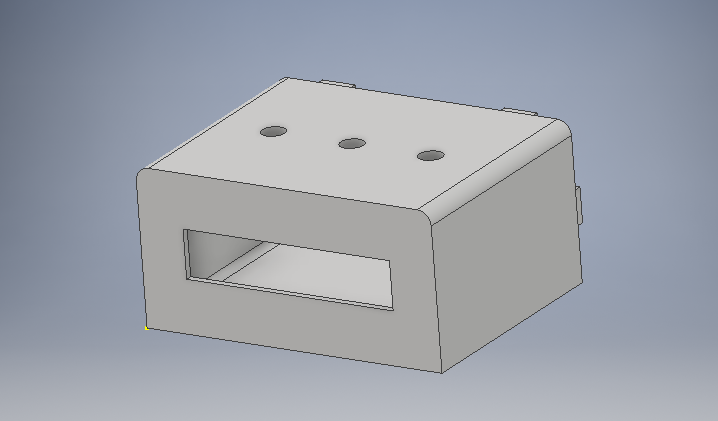
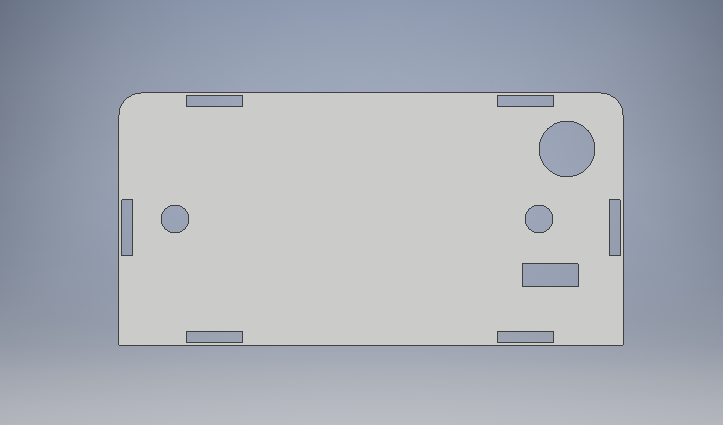
3D printing files
|
|
|
Εδώ θα βρείτε τα αρχείο ipl και stl του κουτιού μας. Μπορείτε να κάνετε τις δικιές σας αλλαγές στο 3D σχέδιο (χρησιμοποιήθηκε το Autodesk Inventor 2017).
|
| ||
Συγχαρητήρια!
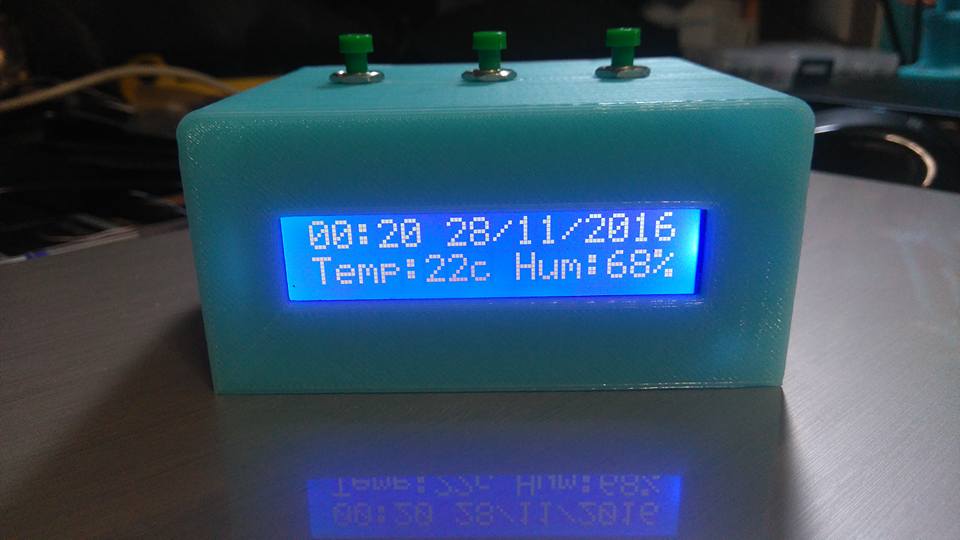
Τέλεια! Μόλις ολοκληρώσατε αυτό τον οδηγό και έχετε έτοιμο στο γραφείο σας το δικό σας ψηφιακό ρολόι-θερμόμετρο!
Περιμένω φωτογραφίες και σχόλια παρακάτω!
Περιμένω φωτογραφίες και σχόλια παρακάτω!


