
|
Available Languages
|

|

|
Εισαγωγή
|
Σε αυτο το tutorial θα δούμε πως μπορούμε να διαβάσουμε μια κάρτα ή ενα NFC tag με το MFRC-522 module.
Η λειτουργία της πλακέτας αυτής βασίζεται στην επαφή ή στην προσέγγιση, σε απόσταση περίπου τεσσάρων με πέντε εκατοστών της κάρτας που περιέχει το τσιπ NFC ώστε να αναγνωριστεί ο κωδικός της. |
Σε αυτόν τον οδηγό θα χρησιμοποιήσουμε το Arduino UNO μαζί με αυτήν την πλακέτα και θα ανοίξουμε την σειριακή οθόνη για να δούμε τον κωδικό της κάρτας μας.
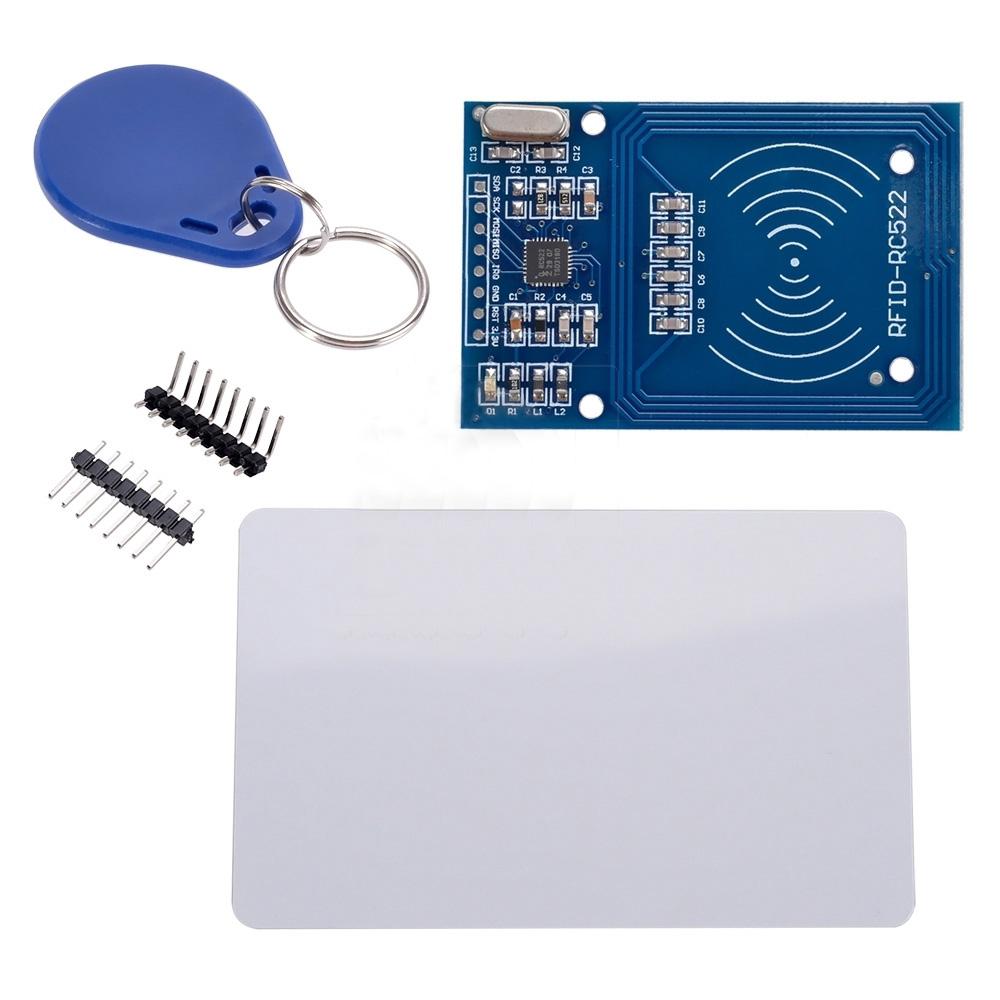
Τα υλικά που θα χρειαστείτε
|
Για το tutorial αυτό θα χρειαστείτε:
|
|
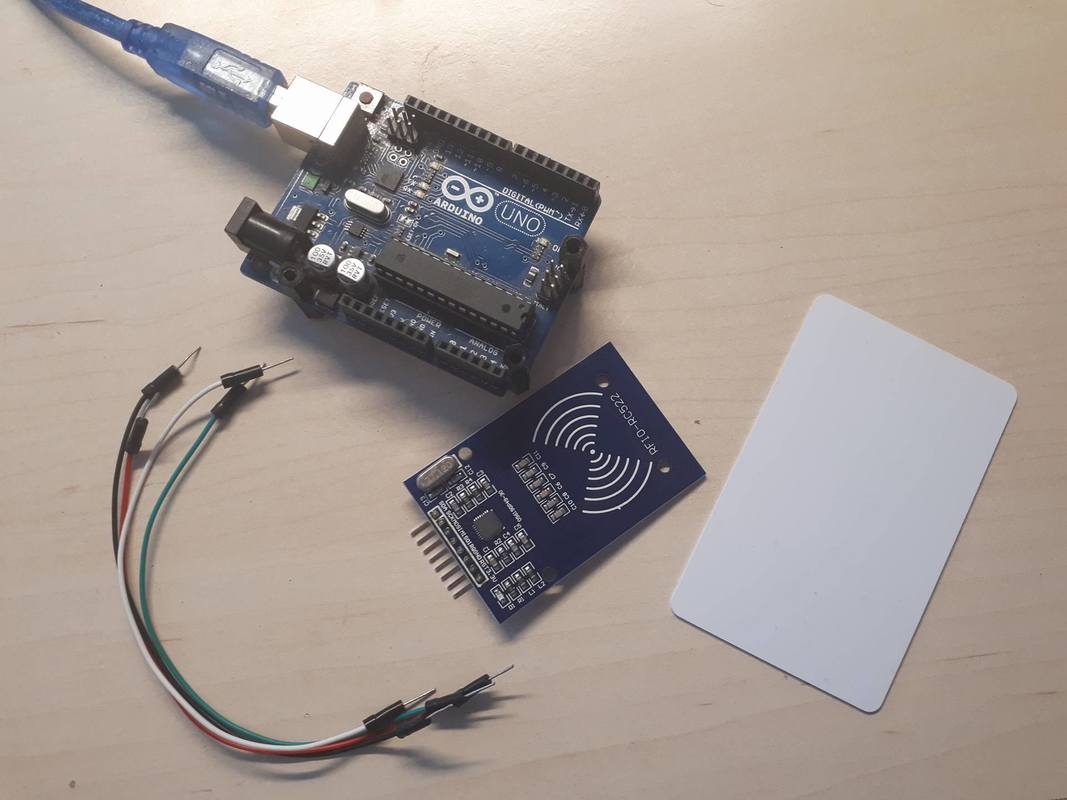
Το κύκλωμα

Οι συνδέσεις είναι αρκετά απλές, ακολουθήστε το παραπάνω σχηματικό.
|
|
Συνδέσεις :
|
Ο κώδικας
1 2 3 4 5 6 7 8 9 10 11 12 13 14 15 16 17 18 19 20 21 22 23 24 25 26 27 28 29 30 31 32 33 34 35 36 37 38 39 40 41 42 43 44 45 46 47 48 49 50 51 52 53 54 55 56 57 58 59 60 61 62 63 64 65 66 67 68 69 70 71 72 73 74 75 76 77 78 79 80 81 82 83 84 85 86 87 88 89 90 91 92 93 94 95 96 97 98 99 100 101 102 103 104 105 106 107 108 109 110 111 112 113 114 115 116 117 118 119 120 121 122 123 124 125 126 127 128 129 130 131 132 133 134 135 136 | /* * ---------------------------------------------------------------------------- * This is a MFRC522 library example; see https://github.com/miguelbalboa/rfid * ---------------------------------------------------------------------------- */ #include <SPI.h> #include <MFRC522.h> constexpr uint8_t RST_PIN = 9; // Configurable, see typical pin layout above constexpr uint8_t SS_PIN = 10; // Configurable, see typical pin layout above MFRC522 mfrc522(SS_PIN, RST_PIN); // Create MFRC522 instance. // Number of known default keys (hard-coded) // NOTE: Synchronize the NR_KNOWN_KEYS define with the defaultKeys[] array constexpr uint8_t NR_KNOWN_KEYS = 8; // Known keys, see: https://code.google.com/p/mfcuk/wiki/MifareClassicDefaultKeys byte knownKeys[NR_KNOWN_KEYS][MFRC522::MF_KEY_SIZE] = { {0xff, 0xff, 0xff, 0xff, 0xff, 0xff}, // FF FF FF FF FF FF = factory default {0xa0, 0xa1, 0xa2, 0xa3, 0xa4, 0xa5}, // A0 A1 A2 A3 A4 A5 {0xb0, 0xb1, 0xb2, 0xb3, 0xb4, 0xb5}, // B0 B1 B2 B3 B4 B5 {0x4d, 0x3a, 0x99, 0xc3, 0x51, 0xdd}, // 4D 3A 99 C3 51 DD {0x1a, 0x98, 0x2c, 0x7e, 0x45, 0x9a}, // 1A 98 2C 7E 45 9A {0xd3, 0xf7, 0xd3, 0xf7, 0xd3, 0xf7}, // D3 F7 D3 F7 D3 F7 {0xaa, 0xbb, 0xcc, 0xdd, 0xee, 0xff}, // AA BB CC DD EE FF {0x00, 0x00, 0x00, 0x00, 0x00, 0x00} // 00 00 00 00 00 00 }; /* * Initialize. */ void setup() { Serial.begin(9600); // Initialize serial communications with the PC while (!Serial); // Do nothing if no serial port is opened (added for Arduinos based on ATMEGA32U4) SPI.begin(); // Init SPI bus mfrc522.PCD_Init(); // Init MFRC522 card Serial.println(F("Try the most used default keys to print block 0 of a MIFARE PICC.")); } /* * Helper routine to dump a byte array as hex values to Serial. */ void dump_byte_array(byte *buffer, byte bufferSize) { for (byte i = 0; i < bufferSize; i++) { Serial.print(buffer[i] < 0x10 ? " 0" : " "); Serial.print(buffer[i], HEX); } } /* * Try using the PICC (the tag/card) with the given key to access block 0. * On success, it will show the key details, and dump the block data on Serial. * * @return true when the given key worked, false otherwise. */ boolean try_key(MFRC522::MIFARE_Key *key) { boolean result = false; byte buffer[18]; byte block = 0; MFRC522::StatusCode status; // http://arduino.stackexchange.com/a/14316 if ( ! mfrc522.PICC_IsNewCardPresent()) return false; if ( ! mfrc522.PICC_ReadCardSerial()) return false; // Serial.println(F("Authenticating using key A...")); status = mfrc522.PCD_Authenticate(MFRC522::PICC_CMD_MF_AUTH_KEY_A, block, key, &(mfrc522.uid)); if (status != MFRC522::STATUS_OK) { // Serial.print(F("PCD_Authenticate() failed: ")); // Serial.println(mfrc522.GetStatusCodeName(status)); return false; } // Read block byte byteCount = sizeof(buffer); status = mfrc522.MIFARE_Read(block, buffer, &byteCount); if (status != MFRC522::STATUS_OK) { // Serial.print(F("MIFARE_Read() failed: ")); // Serial.println(mfrc522.GetStatusCodeName(status)); } else { // Successful read result = true; Serial.print(F("Success with key:")); dump_byte_array((*key).keyByte, MFRC522::MF_KEY_SIZE); Serial.println(); // Dump block data Serial.print(F("Block ")); Serial.print(block); Serial.print(F(":")); dump_byte_array(buffer, 16); Serial.println(); } Serial.println(); mfrc522.PICC_HaltA(); // Halt PICC mfrc522.PCD_StopCrypto1(); // Stop encryption on PCD return result; } /* * Main loop. */ void loop() { // Look for new cards if ( ! mfrc522.PICC_IsNewCardPresent()) return; // Select one of the cards if ( ! mfrc522.PICC_ReadCardSerial()) return; // Show some details of the PICC (that is: the tag/card) Serial.print(F("Card UID:")); dump_byte_array(mfrc522.uid.uidByte, mfrc522.uid.size); Serial.println(); Serial.print(F("PICC type: ")); MFRC522::PICC_Type piccType = mfrc522.PICC_GetType(mfrc522.uid.sak); Serial.println(mfrc522.PICC_GetTypeName(piccType)); // Try the known default keys MFRC522::MIFARE_Key key; for (byte k = 0; k < NR_KNOWN_KEYS; k++) { // Copy the known key into the MIFARE_Key structure for (byte i = 0; i < MFRC522::MF_KEY_SIZE; i++) { key.keyByte[i] = knownKeys[k][i]; } // Try the key if (try_key(&key)) { // Found and reported on the key and block, // no need to try other keys for this PICC break; } } } |
|
Κατεβάστε τον κώδικα απ' εδώ και ανοίξτε το αρχείο με το Arduino IDE. Μέσα θα βρείτε και την βιβλιοθήκη.
Ανοίξτε την σειριακή οθόνη απ' το μενού εργαλεία του Arduino IDE. |
| ||
Σειριακή οθόνη
Τοποθετήστε την κάρτα μπροστά από την πλακέτα.

Συγχαρητήρια!

Αυτό ηταν! Εύκολο, δύσκολο?
Πείτε μου πως σας φάνηκε στα σχόλια παρακάτω!
Πείτε μου πως σας φάνηκε στα σχόλια παρακάτω!


