
|
Available Languages
|

|

|
Εισαγωγή
Το lux (σύμβολο: lx) είναι η μονάδα SI του φωτισμού που μετράει την φωτεινή ισχύ ανά περιοχή. Χρησιμοποιείται στη φωτομέτρηση ως ένα μέτρο της έντασης που προσπίπτει ή περνά μέσα από μια επιφάνεια όπως λαμβάνεται από το ανθρώπινο μάτι.
Φωτεινότητα (Illuminance) ονομάζεται ένα μέτρο του πόσο φωτεινή ροή απλώνεται σε μια δεδομένη περιοχή. Κάποιος μπορεί να σκεφτεί την φωτεινή ροή (μετρήσιμη σε lumens) ως ένα μέτρο του συνολικού «ποσού» του ορατού παρόντος φωτός, και το illuminance ως ένα μέτρο της έντασης του φωτισμού σε μια επιφάνεια. Μια δεδομένη ποσότητα του φωτός θα φωτίσει μια επιφάνεια πιο αμυδρά αν έχει εξαπλωθεί σε μια ευρύτερη περιοχή, έτσι η φωτεινότητα είναι αντιστρόφως ανάλογη της περιοχής. Ένα lux είναι ίσο με ένα lumen ανά τετραγωνικό μέτρο 1 lx = 1 lm/m2 = 1 cd·sr·m–2. (Διαβάστε περισσότερα εδώ)
Το αισθητήριο TSL2561 μπορεί να μετρήσει από 0.1 μέχρι 40,000 Lux (datasheet) και το κόστος του δεν ξεπερνάει τα 10 ευρώ.
Τα υλικά που θα χρειαστούμε
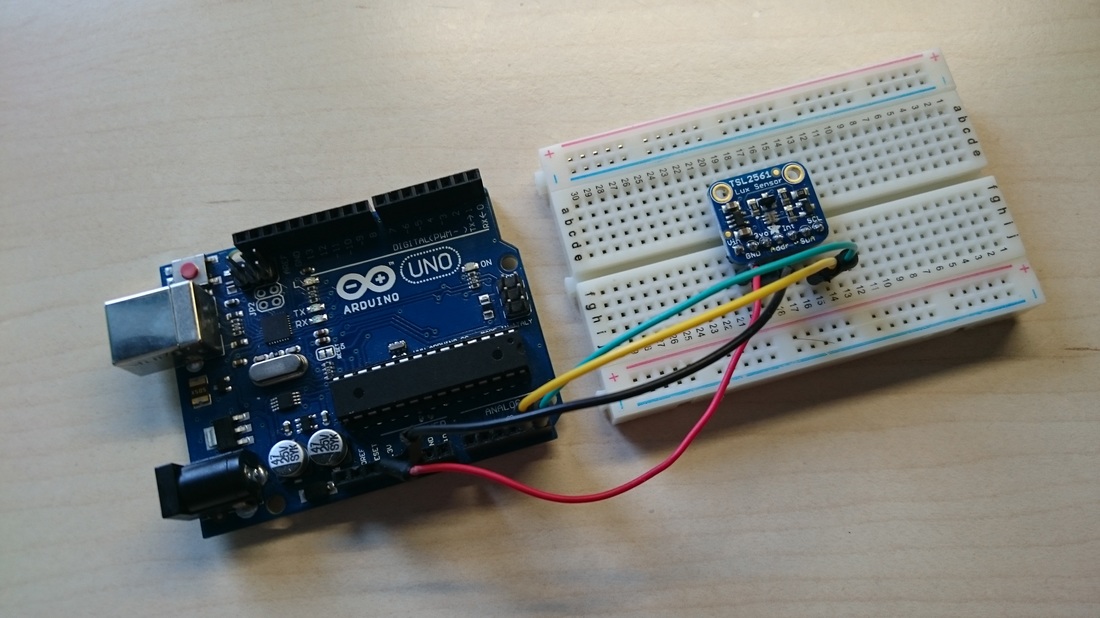
Το κύκλωμα
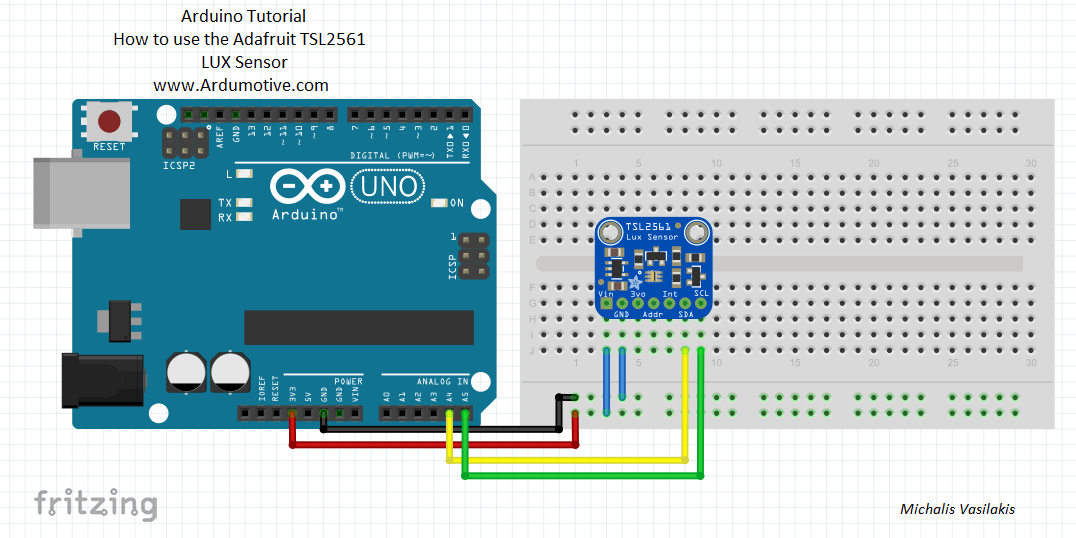
Οι συνδέσεις είναι αρκετά απλές, ακολουθήστε το παραπάνω σχηματικό.
Ο κώδικας
#include <Wire.h>
#include <Adafruit_Sensor.h>
#include <Adafruit_TSL2561_U.h>

/* This driver uses the Adafruit unified sensor library (Adafruit_Sensor),
   which provides a common 'type' for sensor data and some helper functions.

   To use this driver you will also need to download the Adafruit_Sensor
   library and include it in your libraries folder.

   You should also assign a unique ID to this sensor for use with
   the Adafruit Sensor API so that you can identify this particular
   sensor in any data logs, etc.  To assign a unique ID, simply
   provide an appropriate value in the constructor below (12345
   is used by default in this example).

   Connections
   ===========
   Connect SCL to analog 5
   Connect SDA to analog 4
   Connect VDD to 3.3V DC
   Connect GROUND to common ground

   I2C Address
   ===========
   The address will be different depending on whether you leave
   the ADDR pin floating (addr 0x39), or tie it to ground or vcc.
   The default addess is 0x39, which assumes the ADDR pin is floating
   (not connected to anything).  If you set the ADDR pin high
   or low, use TSL2561_ADDR_HIGH (0x49) or TSL2561_ADDR_LOW
   (0x29) respectively.

   History
   =======
   2013/JAN/31  - First version (KTOWN)
*/

Adafruit_TSL2561_Unified tsl = Adafruit_TSL2561_Unified(TSL2561_ADDR_FLOAT, 12345);

/**************************************************************************/
/*
    Displays some basic information on this sensor from the unified
    sensor API sensor_t type (see Adafruit_Sensor for more information)
*/
/**************************************************************************/
void displaySensorDetails(void)
{
  sensor_t sensor;
  tsl.getSensor(&sensor);
  Serial.println("------------------------------------");
  Serial.print  ("Sensor:       "); Serial.println(sensor.name);
  Serial.print  ("Driver Ver:   "); Serial.println(sensor.version);
  Serial.print  ("Unique ID:    "); Serial.println(sensor.sensor_id);
  Serial.print  ("Max Value:    "); Serial.print(sensor.max_value); Serial.println(" lux");
  Serial.print  ("Min Value:    "); Serial.print(sensor.min_value); Serial.println(" lux");
  Serial.print  ("Resolution:   "); Serial.print(sensor.resolution); Serial.println(" lux");
  Serial.println("------------------------------------");
  Serial.println("");
  delay(500);
}

/**************************************************************************/
/*
    Configures the gain and integration time for the TSL2561
*/
/**************************************************************************/
void configureSensor(void)
{
  /* You can also manually set the gain or enable auto-gain support */
  // tsl.setGain(TSL2561_GAIN_1X);      /* No gain ... use in bright light to avoid sensor saturation */
  // tsl.setGain(TSL2561_GAIN_16X);     /* 16x gain ... use in low light to boost sensitivity */
  tsl.enableAutoRange(true);            /* Auto-gain ... switches automatically between 1x and 16x */

  /* Changing the integration time gives you better sensor resolution (402ms = 16-bit data) */
  tsl.setIntegrationTime(TSL2561_INTEGRATIONTIME_13MS);      /* fast but low resolution */
  // tsl.setIntegrationTime(TSL2561_INTEGRATIONTIME_101MS);  /* medium resolution and speed   */
  // tsl.setIntegrationTime(TSL2561_INTEGRATIONTIME_402MS);  /* 16-bit data but slowest conversions */

  /* Update these values depending on what you've set above! */
  Serial.println("------------------------------------");
  Serial.print  ("Gain:         "); Serial.println("Auto");
  Serial.print  ("Timing:       "); Serial.println("13 ms");
  Serial.println("------------------------------------");
}

/**************************************************************************/
/*
    Arduino setup function (automatically called at startup)
*/
/**************************************************************************/
void setup(void)
{
  Serial.begin(9600);
  Serial.println("Light Sensor Test"); Serial.println("");

  /* Initialise the sensor */
  if(!tsl.begin())
  {
    /* There was a problem detecting the ADXL345 ... check your connections */
    Serial.print("Ooops, no TSL2561 detected ... Check your wiring or I2C ADDR!");
    while(1);
  }

  /* Display some basic information on this sensor */
  displaySensorDetails();

  /* Setup the sensor gain and integration time */
  configureSensor();

  /* We're ready to go! */
  Serial.println("");
}

/**************************************************************************/
/*
    Arduino loop function, called once 'setup' is complete (your own code
    should go here)
*/
/**************************************************************************/
void loop(void)
{
  /* Get a new sensor event */
  sensors_event_t event;
  tsl.getEvent(&event);

  /* Display the results (light is measured in lux) */
  if (event.light)
  {
    Serial.print(event.light); Serial.println(" lux");
  }
  else
  {
    /* If event.light = 0 lux the sensor is probably saturated
       and no reliable data could be generated! */
    Serial.println("Sensor overload");
  }
  delay(250);
}
|
Κατεβάστε τον κώδικα απ' εδώ και ανοίξτε το αρχείο με το Arduino IDE. Μέσα θα βρείτε και την βιβλιοθήκη DHT.h.
|
| ||
Ανοίξτε την σειριακή οθόνη απ' το μενού εργαλεία του Arduino IDE.
Συγχαρητήρια!

Αυτό ηταν! Εύκολο, δύσκολο?
Πείτε μου πως σας φάνηκε στα σχόλια παρακάτω!
Πείτε μου πως σας φάνηκε στα σχόλια παρακάτω!


